Quickstart Guide
The IMIconnect Android SDK provides a messaging framework that enables app developers to integrate IMIconnect’s In App and Push messaging services within their mobile applications.
Optional monitoring of device attributes allows change events to be reported back to the IMIconnect platform and values stored against the customer’s profile. These events may then be used to enrich user engagement through the triggering of rules and flows to send messages that may be more relevant to the user.
This Quickstart guide explains all the necessary steps that are required to integrate the IMIconnect Android SDK within an application.
Prerequisites
The minimum requirements to use the IMIconnect SDK are:
Component | Requirement |
|---|---|
Android Operating System | Android OS 4.0 (API Level 15) and above. |
Software |
|
Accounts |
|
Configuration Tasks
To use the IMIconnect SDK within your application follow these tasks in sequence:
Integrate Firebase
The IMIconnect SDK leverages Firebase Cloud Messaging for it's push capability. Please follow the official Firebase setup guide, which will take you through the process of configuring a Firebase project, adding gradle dependencies and google-services.json to your Android Studio project.
Important!
If you use the Firebase Assistant, only follow steps 1 & 2, the SDK takes care of the rest, no additional code is required.
Firebase version support
IMIconnect SDK 2.10.0 supports Firebase versions 11.0.0 and higher.
IMIconnect SDK versions lower than 2.10.0 support Firebase versions 11.0.0 through 15.0.2.
Capture the Firebase Server Key
The Firebase Cloud Messaging server key allows IMIconnect to submit push notifications to your application. The following steps will provide directions for obtaining the key, please make a note of the key for use later in this guide.
- Open the Firebase Console
- Click the Firebase project to open it. (You created this in the previous section)
- Click the Settings icon, followed by Project Settings.
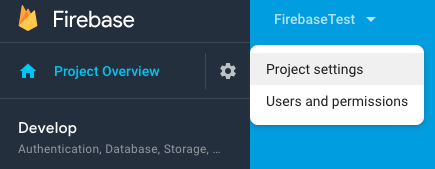
- Make a note of the Server Key (This is needed within the next section)

Configure a IMIconnect Mobile Application
In this section you will configure a mobile application within the IMIconnect Portal.
Your account administrator should have been provided a url to the IMIconnect Portal, this url is unique to your account. If you do not have your account url, please contact your account administrator.
- Login to your IMIconnect Portal account using your unique account url.
- From the menu, click Apps.
![]()
- Click CONFIGURE APPS > MOBILE / WEB.
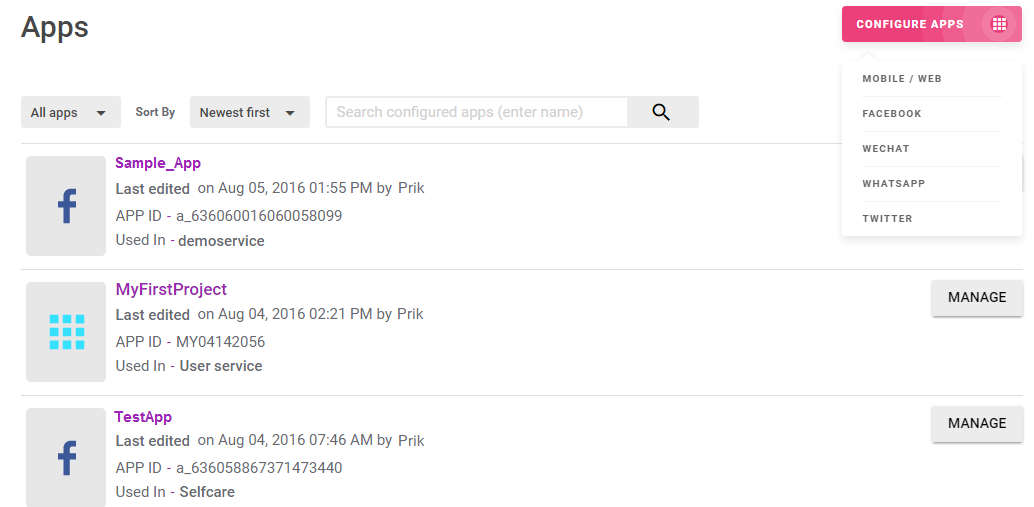
- Enter a name for your application and click NEXT.

- Select 'Mobile' and click NEXT.
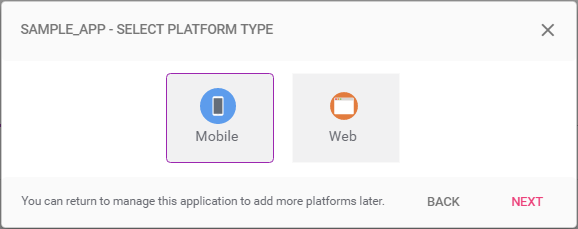
- Select the Android platform and click NEXT.
- The Android platform specific features are displayed. Enable the features that you wish to use and configure the settings as appropriate:
Feature | Settings |
|---|---|
Real-time messaging | Configure the following:
Note: The RTM Transport and Security settings are common for all the configured platforms of the app. If you set for one platform, the same is applied to all other platforms. Transport protocols Security settings Enable RTM payload encryption to encrypt the RTM payload in transit. |
| Push notifications | Enter your FCM Server key within the Push notifications settings box. |
| Two factor authentication | Select the Sender ID through which an OTP (One Time Password) is sent. |
| Device attributes | To monitor different attributes such as Time Zone, IMEI, RAM, Location and so on. |
![]()
- Click SAVE.
- Make a note of the Client Key. This will be used while integrating the IMIconnect SDK within your application.
- Click SAVE.
An overview screen will appear with the newly created application profile and the corresponding App ID.
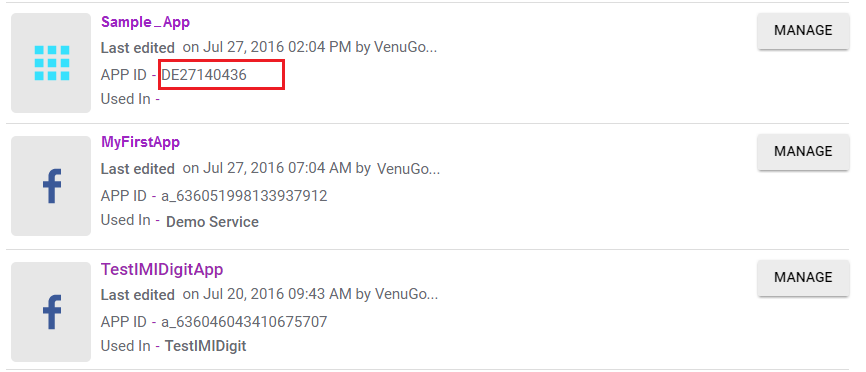
- Make a note of the App ID. This will be used while integrating the IMIconnect SDK within your application.
Project Setup
This section provides step for adding the IMIconnect SDK library (.aar) to your Android application.
The IMIconnect SDK supports Android version 4.0 and above.
- From the IMIconnect Portal menu, go to Tools > DOWNLOADS to download the Android SDK.
- Unzip the SDK.
- Open your Android Studio project.
- Right-click on your project window and click Open Module Settings.
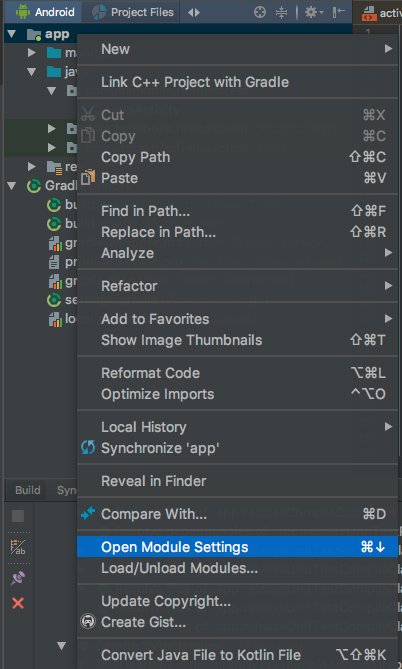
- Click the + button on the top to add a new module. A New Module screen appears.
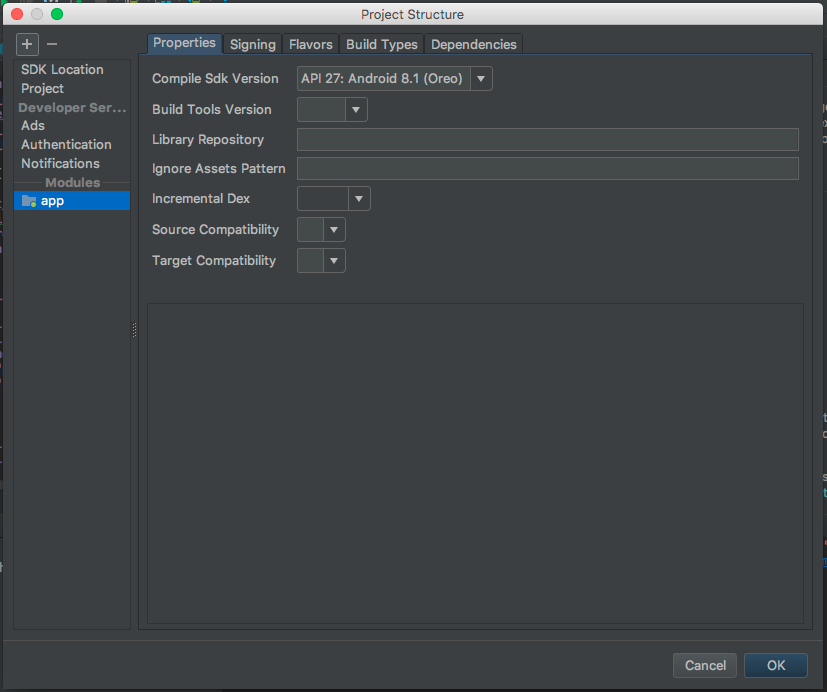
- Select Import .JAR/.AAR package and click Next.

- Import the IMIconnect Android SDK module IMIconnectCore.aar from the extracted zip.
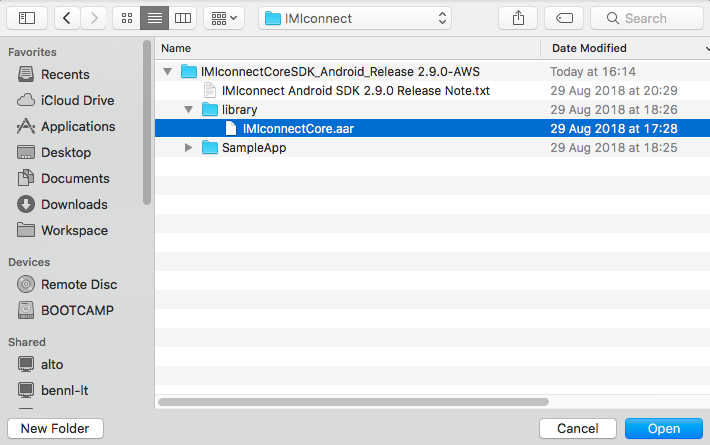
- Wait while the module is imported, before adding to the app dependencies:
- Click Dependencies.
- Click + -> Module dependency.
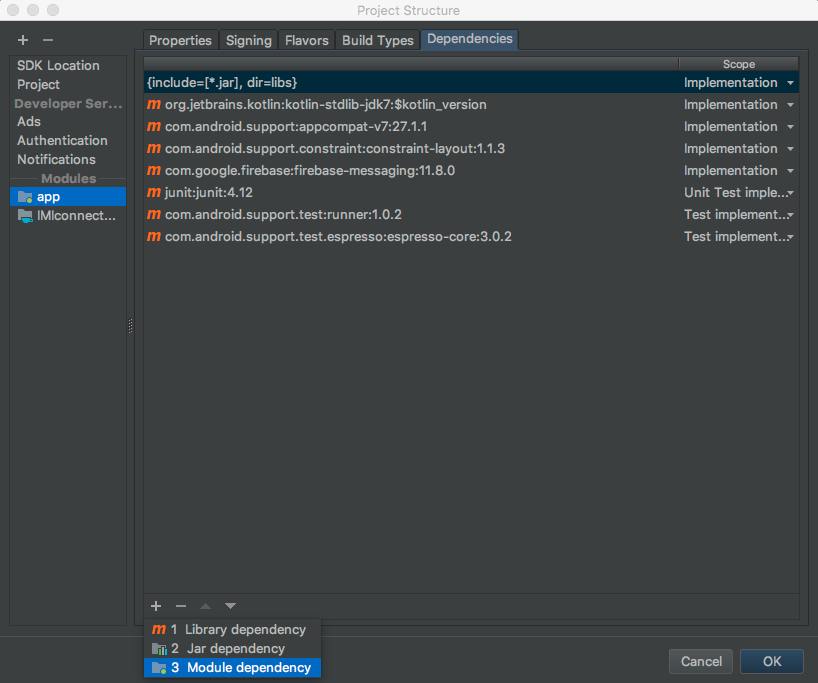
- Select IMIconnectCore and click Next.
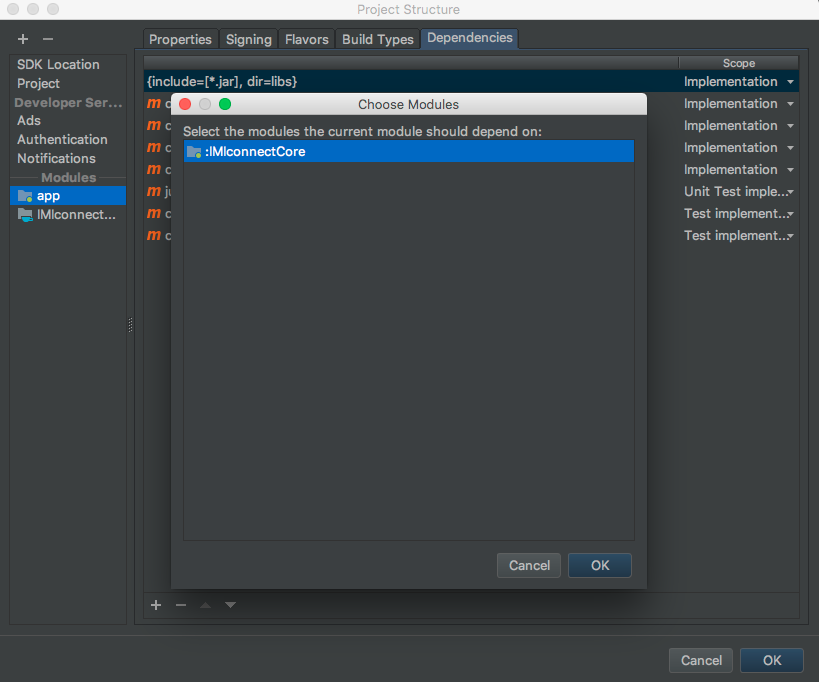
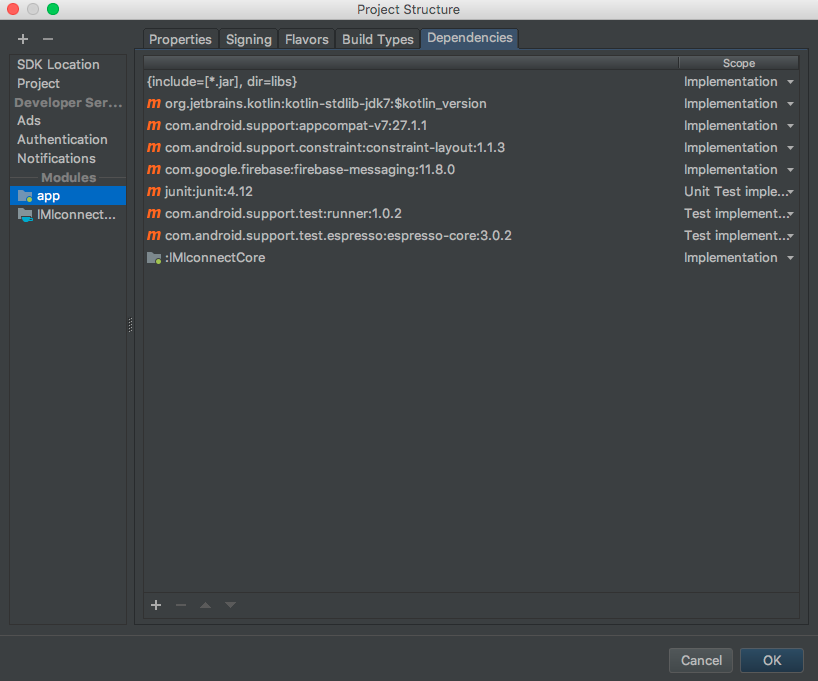
- Click OK.
Code Integration
Follow the below steps to integrate IMIconnect Android SDK in your application:
a. Configure Android Gradle
b. Configure Android Manifest
c. Configure Proguard Rules
d. Initialize the SDK
e. Register a Device
f. Receive messages
g. Connect to IMIconnect
h. Listen for connection status events
i. Fetch Topics
j. Subscribe to a Topic
k. Unsubscribe from a Topic
l. Create a Thread
m. Publish a Message
n. Disconnect from IMIconnect
a. Configure Android Gradle
1.Add Firebase to your android project.
2.In your app/build.gradle, add the following dependencies.
apply plugin: 'com.android.application'

android {
  // ...
}

dependencies {
  // ...
  implementation project(':IMIconnectCore')

  implementation 'com.google.firebase:firebase-messaging:11.8.0'
  implementation 'com.google.android.gms:play-services-location:11.8.0'
  implementation 'org.eclipse.jetty:jetty-websocket:8.1.17.v20150415'
  implementation 'com.firebase:firebase-jobdispatcher:0.8.5'
  //For SDK 2.10.0 and lower use SQLcipher 3.5.9 instead of 4.0.1
  implementation 'net.zetetic:android-database-sqlcipher:4.0.1@aar'
}

apply plugin: 'com.google.gms.google-services'
Note
The above assumes that your imported module is called IMIconnectCore, if you have used a different name during import then please adjust accordingly.
You should check the installed Google Play Services version before calling IMIconnect.register and prompt users to update if necessary. The SDK provides the helper class ICGooglePlayServicesHelper to assist with this.
b. Configure Android Manifest
In your project, open AndroidManifest.xml and add the content below. The appid and clientkey values are obtained during application creation in the Add a Mobile Application section:
For the SDK to function correctly, you must add the correct permissions to your app manifest. Some permissions are optional and need only be included if you use specific features, please refer to the comments below for further details.
<!-- PERMISSIONS -->
<!-- REQUIRED for connecting to IMIconnect -->
<uses-permission android:name="android.permission.WAKE_LOCK"/>
<uses-permission android:name="android.permission.RECEIVE_BOOT_COMPLETED"/>

<!-- OPTIONAL add this permission if you wish to capture IMSI and IMEI details -->
<uses-permission android:name="android.permission.READ_PHONE_STATE"/>
<!-- OPTIONAL add this permission if you wish to monitor network attributes -->
<uses-permission android:name="android.permission.ACCESS_NETWORK_STATE"/>
<!-- OPTIONAL add this permission if you wish to monitor account attributes such as email-->
<uses-permission android:name="android.permission.GET_ACCOUNTS"/>
<!-- OPTIONAL add this permission if you wish to monitor location and/or cell id changes -->
<uses-permission android:name="android.permission.ACCESS_COARSE_LOCATION" />
<!-- OPTIONAL add this permission if you wish to monitor location changes to a fine degree of accuracy -->
<uses-permission android:name="android.permission.ACCESS_FINE_LOCATION" />

<!-- Replace YOUR_APPLICATION_CLASS_NAME with the name of your actual class that derives from the Application class. Do not worry if you do not already use an Application subclass in your project, we will create one later in this guide -->
<application
   android:name="YOUR_APPLICATION_CLASS_NAME"
   android:allowBackup="true"
   android:label="@string/app_name"
   android:theme="@style/AppTheme">
   <activity
       android:name="YOUR_ACTIVITY_NAME"
       android:label="@string/app_name">
       <intent-filter>
           <!-- OPTIONAL add this scheme, host values for deep link action  -->
           <data
               android:host="command"
               android:scheme="@string/app_id"/>

           <category android:name="android.intent.category.DEFAULT"/>
           <category android:name="android.intent.category.BROWSABLE"/>

           <action android:name="android.intent.action.MAIN"/>
           <category android:name="android.intent.category.LAUNCHER"/>
       </intent-filter>
   </activity>

   <!-- MANDATORY: In order to receiving incoming In App and Push Messages, you must either:

1. Register the standard ICMessagingReceiver and register a ICMessagingListener with the ICMessaging class, or
2. Register a subclass of ICMessagingReceiver and override class methods
-->
   <receiver
       android:name="MESSAGE_RECEIVER_NAME"
       android:enabled="true"
       android:exported="false"
             android:permission="com.imimobile.connect.core.permission.PUSH_PERMISSION">
       <intent-filter>
           <action android:name="com.imimobile.connect.core.rtmevent"/>
           <action android:name="com.imimobile.connect.core.notification.click"/>
           <action android:name="com.imimobile.connect.core.intent.notification.RECEIVE"/>
       </intent-filter>
   </receiver>

   <!-- Meta data needed for application identification -->
   <!-- Add the app id generated from IMIconnect -->
   <meta-data
       android:name="appid"
       android:value="@string/app_id"/>

   <!-- Add the client key generated from IMIconnect -->
   <meta-data
       android:name="clientkey"
       android:value="@string/client_key"/>

  <!-- OPTIONAL Add the server domain to override zero-rating domain -->
   <meta-data
       android:name="serverdomain"
       android:value="@string/server_domain"/>

</application>
Edit your strings.xml file and provide the appropriate values for the below keys:
- app_id - The App ID that is generated by IMIconnect for your application.
- client_key- The clientkey that is generated by IMIconnect for your application.
<resources>

    <string name="app_id">APP ID</string>
    <string name="client_key">Client key</string>

  <!-- OPTIONAL Add the server domain to override zero-rating domain -->
		<string name="server_domain">Your IMIconnect's domain</string>

</resources>
c. Configure Proguard Rules
Add the below rule in proguard-rules.pro file.
If you use an obfuscation tool other than ProGuard, please refer to the tool providers documentation for configuring equivalent rules.
-dontwarn org.eclipse.jetty.**
-dontwarn com.google.firebase.messaging.FirebaseMessaging
-dontwarn javax.servlet.**
-dontwarn org.slf4j.**
-keep class net.sqlcipher.** { *; }
-keep class net.sqlcipher.database.* { *; }
d. Initialize the SDK
The SDK must be initialized before attempting to use any of its features. The SDK initialization must be done from your Application.onCreate method. If your app does not have an Application class you should create one.
Ensure you use the same name for your Application class as specified in your AndroidManifest.xml
public class MyApplication extends Application
{
    @Override
    public void onCreate()
    {
        super.onCreate();

        // Initialize the IMIconnect SDK
        try
        {
            IMIconnect.startup(this);
        } catch (ICException e)
        {
            e.printStackTrace();
        }
    }
}
Registering Notification channel for Android O and above
Starting in Android 8.0 (API level 26), all notifications must be assigned to a channel or else notifications will not appear.
Channels allow users greater control over their notifications. Users may disable specific channels or control the visual and auditory options for each channel directly from the Android system settings app. Users may also long-press a notification to change behaviours for the associated channel.
Sample code to register Notification channel:

if (Build.VERSION.SDK_INT >= Build.VERSION_CODES.O)
{
  // Provide your channel name & description that can be seen by User.
  String name = getString(R.string.channel_name);
  String description = getString(R.string.channel_description);

  // A channel registered with the id of ICConstants.DEFAULT_CHANNEL_ID is required as a minimum
  NotificationChannel channel = new NotificationChannel(ICConstants.DEFAULT_CHANNEL_ID, name, NotificationManager.IMPORTANCE_DEFAULT);

  channel.setDescription(description);

  // Register the channel with the system
  NotificationManager notificationManager = (NotificationManager) getSystemService(Context.NOTIFICATION_SERVICE);

  notificationManager.createNotificationChannel(channel);
}
e. Register a device
The users device must be registered with the IMIconnect platform before other features can be used. To register a device with the platform, create a ICDeviceProfile instance and invoke the IMIconnect.register method.
A device profile must always have a unique device id and user id, if you do not supply a user id then the platform will assign one for you. Typically you will want to supply your own user id value that corresponds to a user within your backend systems.
IMIconnect.register(new ICDeviceProfile(ICDeviceProfile.getDefaultDeviceId()), new ICRegistrationCallback()
{
   @Override
   public void onRegistrationComplete(final Bundle bundle, final ICException exception)
   {
     if (exception != null)
     {
       Log.e("Registration", "Registration failed! Reason:" + exception.toString());
     }
     else
     {
       Log.d("Registration", "Registration succeeded!");
     }
   }
});
IMIconnect.register(new ICDeviceProfile(ICDeviceProfile.getDefaultDeviceId(),enteredUserId), new ICRegistrationCallback()
{
   @Override
   public void onRegistrationComplete(final Bundle bundle, final ICException exception)
   {
     if (exception != null)
     {
       Log.e("Registration", "Registration failed! Reason:" + exception.toString());
     }
     else
     {
       Log.d("Registration", "Registration succeeded!");
     }
   }
});
ICDeviceProfile provides a convenience device id implementation that is based on Secure.ANDROID_ID, but you are free to supply your own value instead if your wish.
If your solution uses provisioned customer profiles (a.k.a master profiles), you will need to call IMIconnect.updateProfileData to link your device profile to the customer profile. You may do this after successful device registration.
See here for information on provisioning customer profiles.
f. Receive messages
Incoming Push and In App messages are received by either implementing a custom ICMessagingReceiver subclass, or by registering a ICMessagingListener implementation with the ICMessaging singleton.
Implement your custom receiver or listener as per the below code samples:
public class MyReceiver extends ICMessagingReceiver
{
  @Override
  protected void onMessageReceived(final Context context, final ICMessage message)
  {
    Log.d("MessageReceived", message.getMessage());
  }
}
ICMessaging.getInstance().registerListener(new ICMessagingListener()
	{
		@Override
		public void onMessageReceived(final ICMessage icMessage)
		{
      Log.d("MessageReceived", message.getMessage());
		}

		@Override
		public void onConnectionStatusChanged(final ICConnectionStatus icConnectionStatus, final ICException e)
		{
			//For InApp Messaging connection events
		}
	});
When using a ICMessagingReceiver subclass, ensure that you update the class name within your application manifest. See Configure Android Manifest
The following sections only relevant if you wish to use In App Messaging.
g. Connect to IMIconnect
To use In App Messaging you must establish a connection with the IMIconnect platform. Invoke the connect method to establish a connection and allow messages to be received.
This method will throw an
ICExceptionwhen In App Messaging is not enabled for the app or a device is not registered with the SDK.
ICMessaging messaging = ICMessaging.getInstance();

try
{
  messaging.connect();
}
catch (ICException e)
{
  Log.e("Connect", e.toString());
}
h. Listen for connection status events
Events are raised by the SDK whenever the connection status has changed. To receive these events in your application either:
- Create a receiver class extending
ICMessagingReceiverand override the onConnectionStatusChanged method. -- OR -- - Implement and register a ICMessagingListener.
public class MyReceiver extends ICMessagingReceiver
{
  ...

  @Override
  protected void onConnectionStatusChanged(final Context context, final ICConnectionStatus status, final ICException e)
  {
    Log.d("ConnectionStatusChanged", "Status : " + status.toString());

    if (e != null)
    {
      Log.e("ConnectionStatusChanged", "Exception : " + e.toString());
    }
  }
}
ICMessaging.getInstance().registerListener(new ICMessagingListener()
	{
		...

		@Override
		public void onConnectionStatusChanged(final ICConnectionStatus icConnectionStatus, final ICException e)
		{
      Log.d("ConnectionStatusChanged", "Status : " + status.toString());

      if (e != null)
      {
        Log.e("ConnectionStatusChanged", "Exception : " + e.toString());
      }
		}
	});
i. Fetch Topics
IMIconnect supports Topic based messaging, use the fetchTopics method to retrieve a list of topics configured for your application. You can subscribe users, or publish messages, to those topics.
- Topics can be configured by an Admin in admin console of IMIconnect.
ICMessaging.getInstance().fetchTopics(0, new ICFetchTopicsCallback()
{
  @Override
  public void onFetchTopicsComplete(final ICTopic[] topics, final boolean hasMoreData, final ICException exception)
  {
    if (exception != null)
    {
      Log.e("fetchTopics", "fetchTopics failed! Reason:" + exception.toString());
      return;
    }

    Log.e("fetchTopics", "fetchTopics success:");
  }
});
j. Subscribe to a Topic
Invoke the subscribe method to subscribe the current user to a topic.
String topicId = "TEST";

 ICMessaging.getInstance().subscribeTopic(topicId, new ICSubscribeTopicCallback()
  {
    @Override
    public void onSubscribeTopicComplete(final String topicId, final ICException exception)
    {
      if (exception != null)
      {
        Log.e("SubscribeTopic", exception.toString());
      }
      else
      {
        Log.d("SubscribeTopic", "Subscribed Successfully");
      }
    }
  });
k. Unsubscribe from a Topic
Invoke the unsubscribeTopic method to unsubscribe the current user from a topic.
String topicId = "TEST";

ICMessaging.getInstance().unsubscribeTopic(topicId, new ICUnsubscribeTopicCallback()
{
  @Override
  public void onUnsubscribeTopicComplete(final String topicId, final ICException exception)
  {
    if (exception != null)
    {
      Log.e("UnsubscribeTopic", exception.toString());
    }
    else
    {
      Log.d("UnsubscribeTopic", "Unsubscribed Successfully");
    }
  }
});
l. Create a Thread
All In App Messages within IMIconnect are grouped by threads. In order to publish messages you must first create an ICThread object.
When responding to an incoming message, you can obtain the ICThread directly from the incoming message.
ICThread thread = new ICThread();

thread.setTitle("title");
thread.setCategory("category");

ICMessaging.getInstance().createThread(thread, new ICCreateThreadCallback()
{
  @Override
	public void onCreateThreadComplete(final ICThread icThread, final ICException e)
	{
	  if (e == null)
		{
		  //Success
		}
		else
		{
		  //Failure
			e.printStackTrace();
		}
	}
});
m. Publish a Message
Invoke publishMessage to publish a message to IMIconnect.
Note:
An ICThread object is obtained by calling the
createThreadmethod or from a received incoming message.
ICMessage message = new ICMessage();

message.setMessage("Test message");
message.setThread(yourThreadObj);

ICMessaging.getInstance().publishMessage(message, new ICPublishMessageCallback()
  {
    @Override
    public void onPublishMessageComplete(final ICMessage message, final ICException exception)
    {
      if (exception != null)
      {
        Log.e("PublishMessage", exception.toString());
      }
      else
      {
        Log.d("PublishMessage", "Published Sucessfully");
      }
    }
  });
n. Disconnect from IMIconnect
This method is used to disconnect from IMIconnect. Once disconnected, incoming In App messages will not be received.
This method throws an exception when In App Messaging is not enabled for the app.
ICMessaging messaging = ICMessaging.getInstance();

try
{
  messaging.disconnect();
}
catch (ICException e)
{
  Log.e("Disconnect", e.toString());
}
End
Integration of the IMIconnect SDK is now complete.
Updated almost 3 years ago