Quickstart Guide
To send web push notifications, the client website must be configured to show the popup. The pop-up appears when the customer's navigate to the website. When the customers accept to receive web push notifications, a service worker is created in the browser's background. The service worker constantly listens to the push messaging server and shows the notification even when the website is closed.
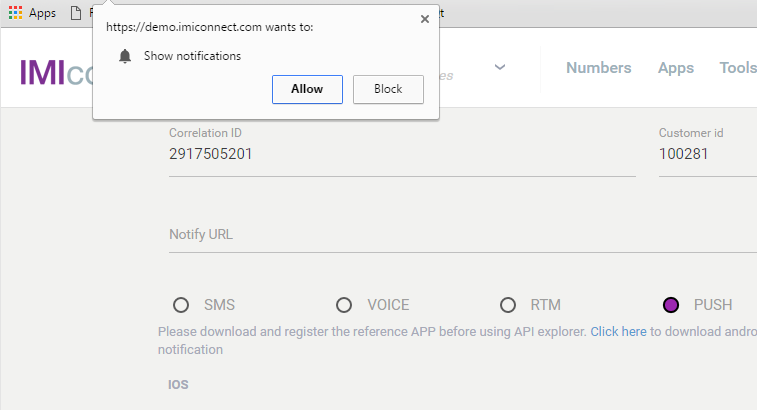
Figure 1: Show Notifications

Figure 2: Sample Notifications
Web push notifications are not supported in private browsing mode.
Prerequisites
The minimum requirements to use IMIconnect JavaScript SDK are:
Component | Requirement |
|---|---|
Apple Push Notification | An APNs certificate, to enable Push Notification services. |
Google Push Notification | A FCM certificate, to enable Push Notification services. |
Account |
|
| Software | IMIconnect JavaScript SDK |
Web push notifications are supported on the following OS and browsers:
| OS | Chrome | Firefox | Safari |
|---|---|---|---|
| Windows Desktop (Version 7 ,8,10) | Yes | Yes | No |
| Mac OS X 10.11 (EI Captain) | Yes | Yes | Yes |
| Linux (Fedora 24) | Yes | Yes | No |
| iOS (9.x) | No | No | No |
| Android (5.x) | Yes | No | No |
Configuration Tasks
- Setup FCM for Chrome and Firefox Browsers
- Setup APNs for Safari Browser
- Add Web Application in IMIconnect
- Download and Integrate JavaScript SDK in your Website
- Sending Push Messages to Customers
Setup FCM for Chrome and Firefox Browsers
To create Google API project, follow these steps:
- Go to Google Firebase Console.
- Click Add Proejc.

Figure 3: Welcome to Firebase
- Add the following in the screen that appears:
- Project name: Enter a name for your project.
- Country/region: Select the country name.
- Select the Default setting and Terms and conditions check-box
- Click CREATE PROJECT. to continue.
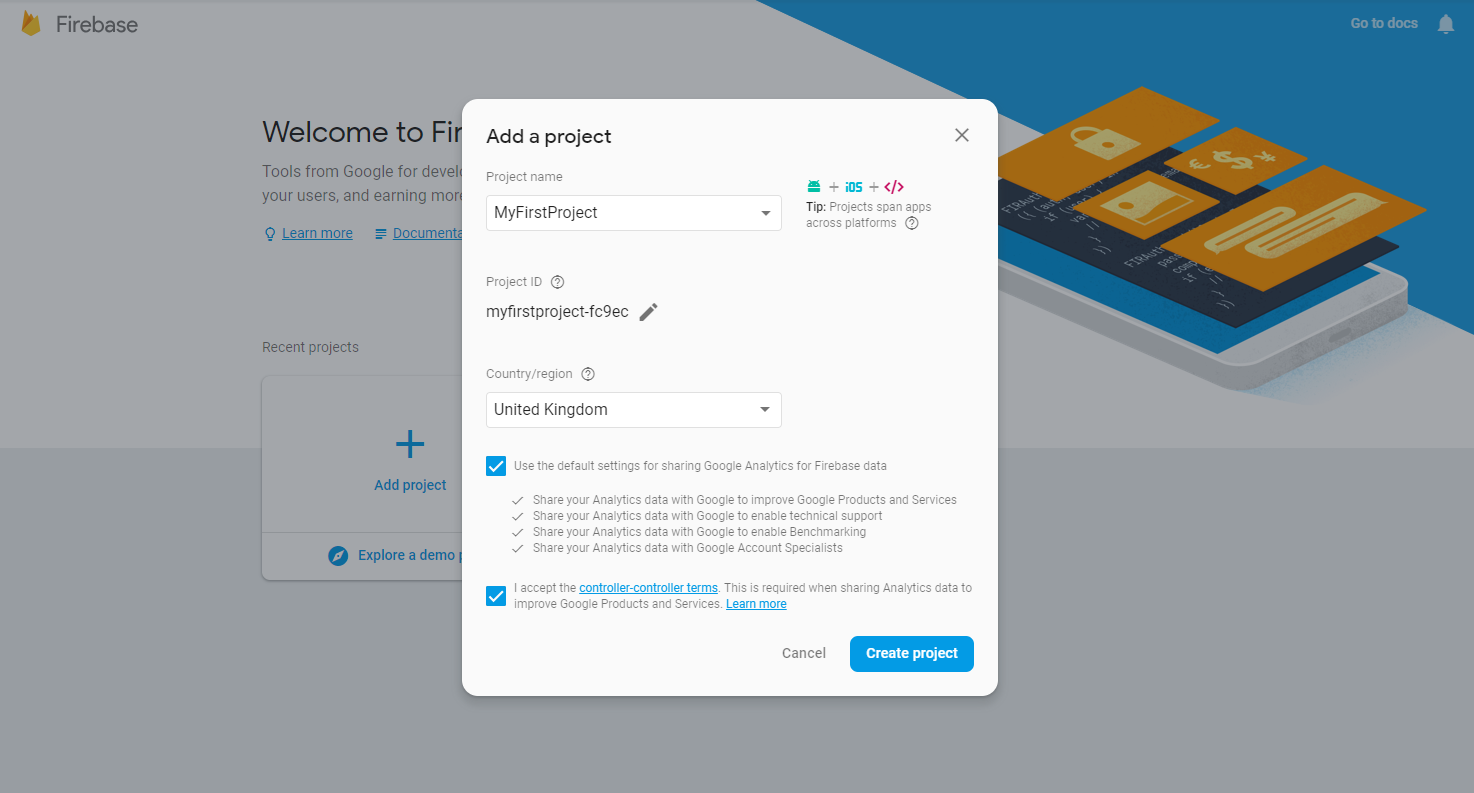
Figure 4: Create Project
- The console will create a project with the given details.
- Click Continue to proceed.
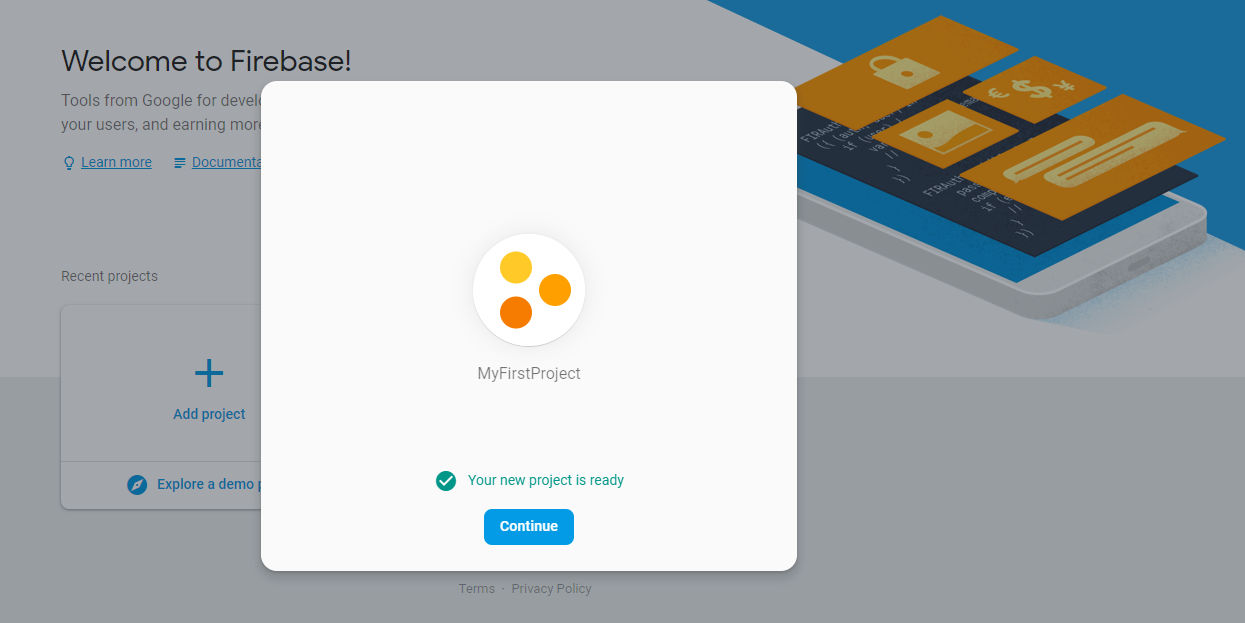
Figure 5: Project Created
- On overview page, Click icon text toProject Overview
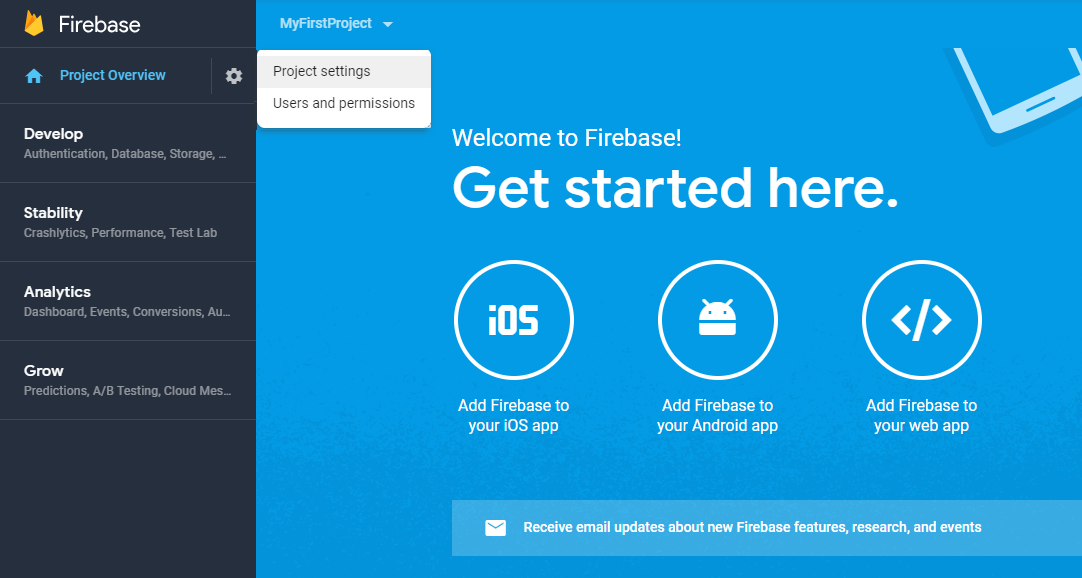
Figure 6: Add Firebase to web app
- The project setting details are displayed, copy the Web API Keyin IMIconnect Web APP setting Page
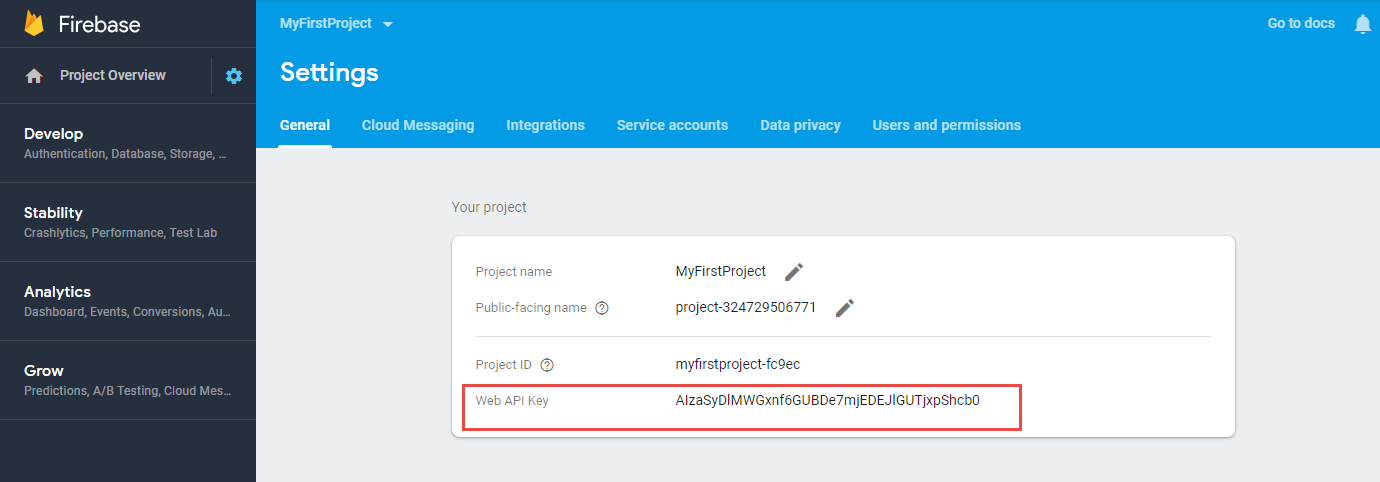
Figure 6: General setting page
- Click on Cloud Messaging.
While creating chrome/Firefox app, you can enter either the Legacy server key or the Server Key in the API Key and Sender ID for Project number.
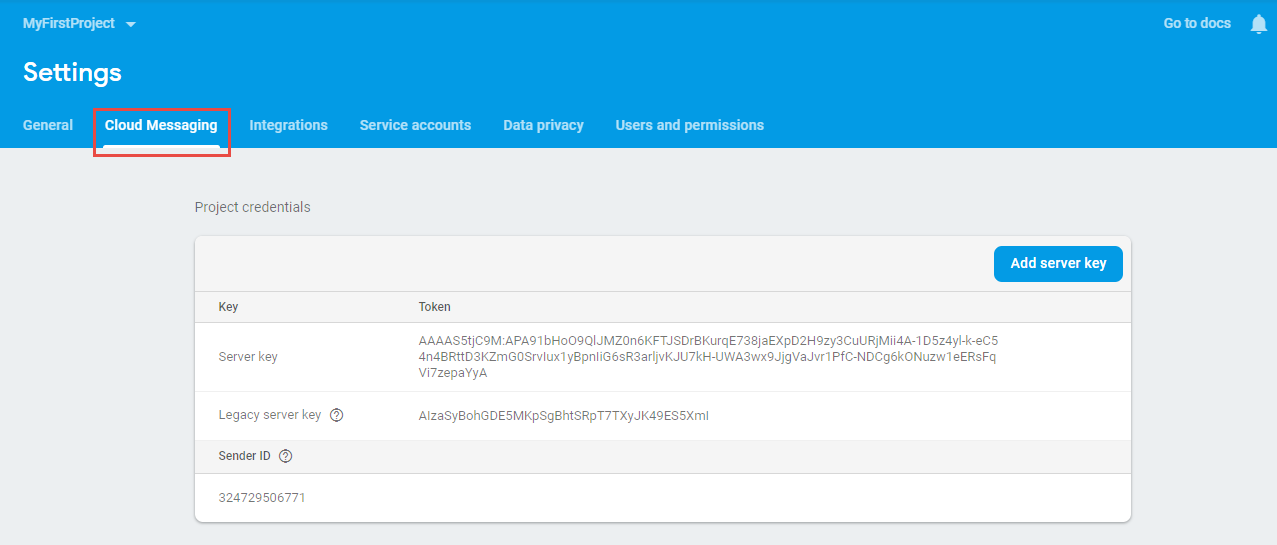
Figure 7: Project Credentials
The API Key can either be the Legacy server key or the Server Key.

Figure 8: User Interface
The snippet contains initialization information to configure the Firebase JavaScript SDK to use Authentication, Cloud Storage and the Realtime Database.
User can take the apikey and messagingSenderId to create a web push chrome application.
Setup APNs for Safari Browser
The following steps will guide you through the process of APNs setup, certificate creation, and configuration.
- Go to the Apple Developer Portal.
- Proceed to Certificates, Identifiers & Profiles. The screen will display all the certificates configured for your applications.
Certificates are configured within the Certificates section.
- Click the + button to add a new certificate. A screen is displayed to select a certificate for your environment.

Figure 9: iOS certificate display
- Select the Apple Push Notification service SSL (Production) option.
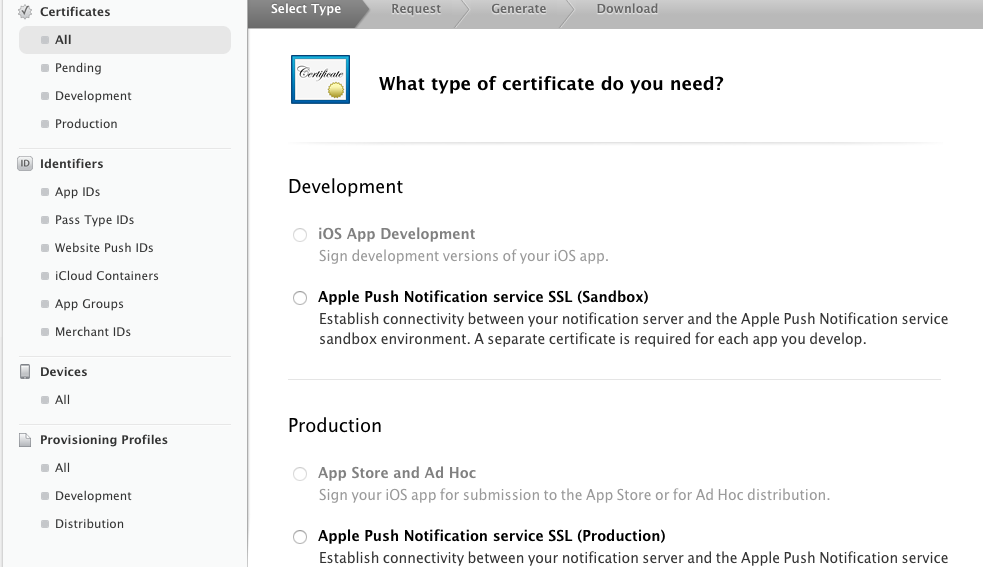
Figure 10: SSLProduction setting
- Select your App ID from the drop-down list.
If an App ID is not available, a new App ID must be created.
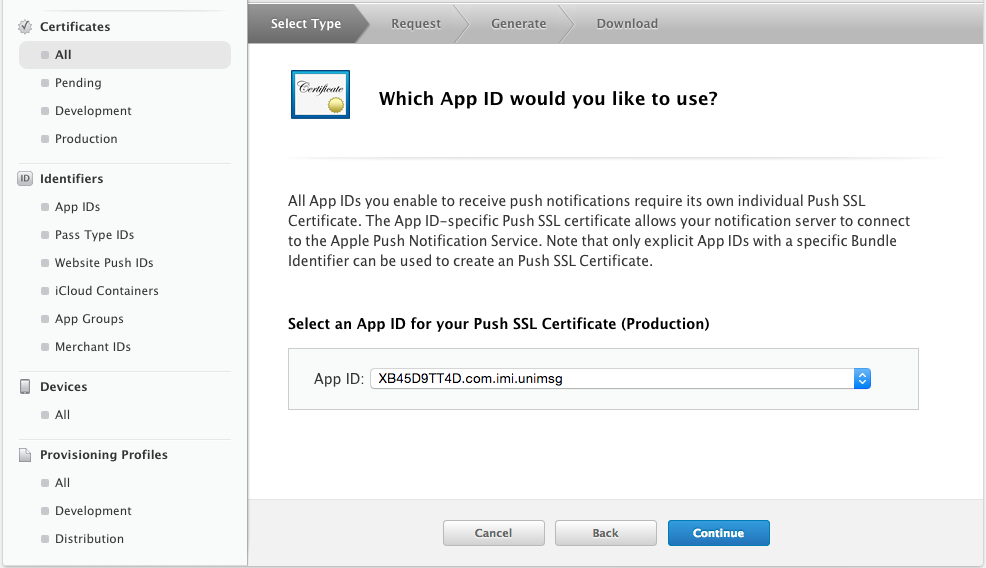
Figure 11: App ID
- Click Continue.
Create Certificate Signing Request (CSR)
- Follow the on screen instructions to create a Certificate Signing Request, Generate, and Approval.
- Click Continue.
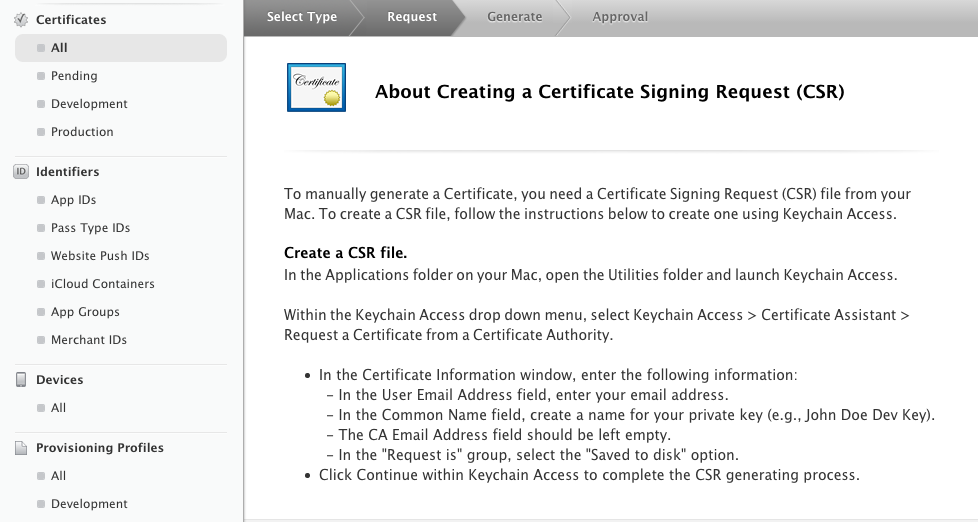
Figure 12: Certificate Signing Request
Follow the below steps if you need further assistance in Certificate Signing Request, Generate, and Approval explained in the above screen.
Launch Keychain Access
- To launch Keychain Access from an Apple Mac:
a. Open spotlight: cmd + space key.
b. Type Keychain Access. The Keychain Access screen is displayed. - Select Request a Certificate from a Certificate Authority option.
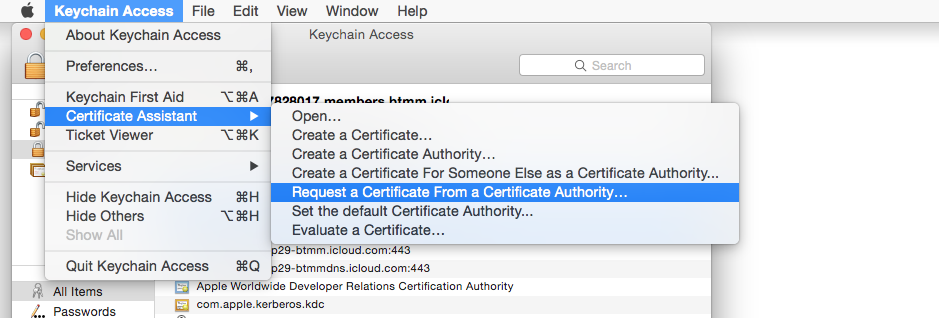
Figure 13: Request certificate
The Certificate Assistant will appear to help you create the request.
Create Certificate
Within the Certificate Assistant complete the following steps:
- Enter the following details for your certificate:
a. User Email Address: Enter email address that matches with the Apple developer account ID.
b. Common Name: A name for your certificate.
Do not enter CA Email.
- Select Request is: -> Saved to disk option.
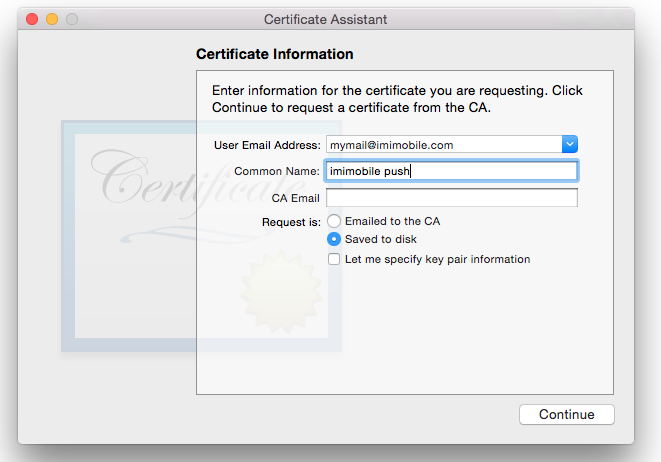
Figure 14: Create certificate
- Click Continue to save the certificate on to your Mac.
Submit Request
To submit a Certificate Signing request, return to the Apple Developer Portal.
- Click Choose File and select the certificate file that was created in the previous step.
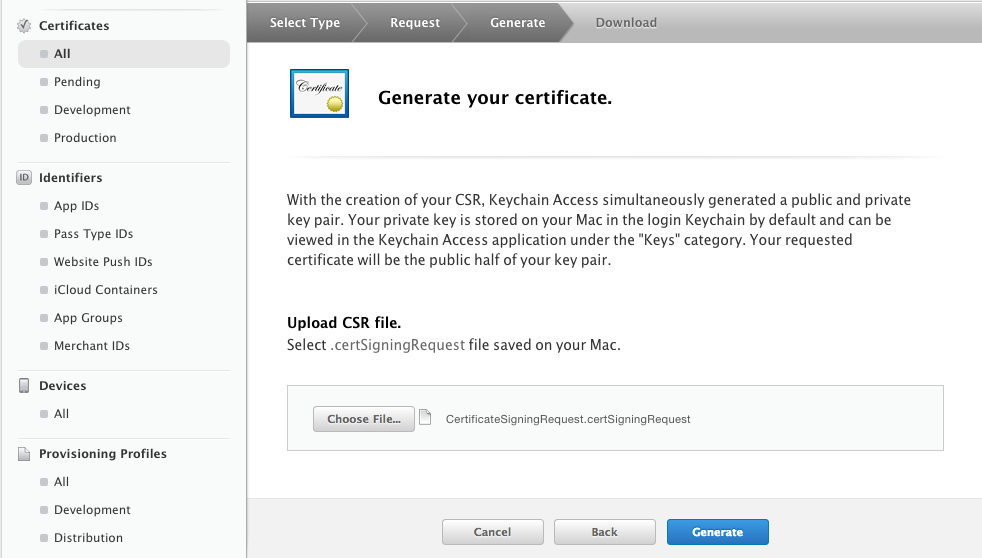
Figure 15: Generate certificate
- Click Generate.
The Apple Push Notification service SSL certificate is generated.
Download Certificate
Once the APNs SSL certificate has been generated it is ready to be downloaded.
- Click Download to download the certificate.
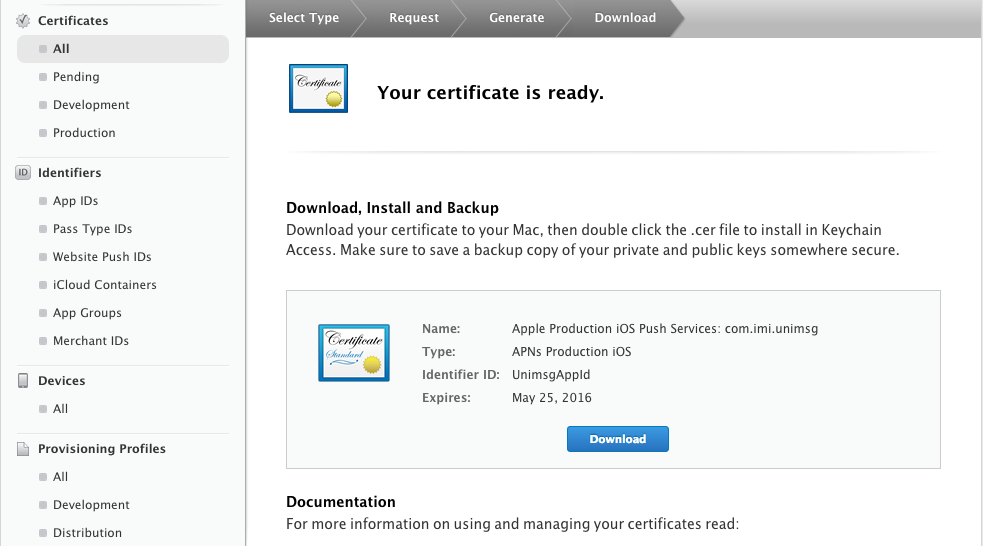
Figure 16: Certificate created
Add Certificate to Keychain
- Open the certificate to install it to your Keychain.
- Within Keychain Access:
- Select the login keychain and the category as My Certificates.
- Locate and select the certificate.
- Right-click and select Export .
- Save the certificate as a .p12 file.
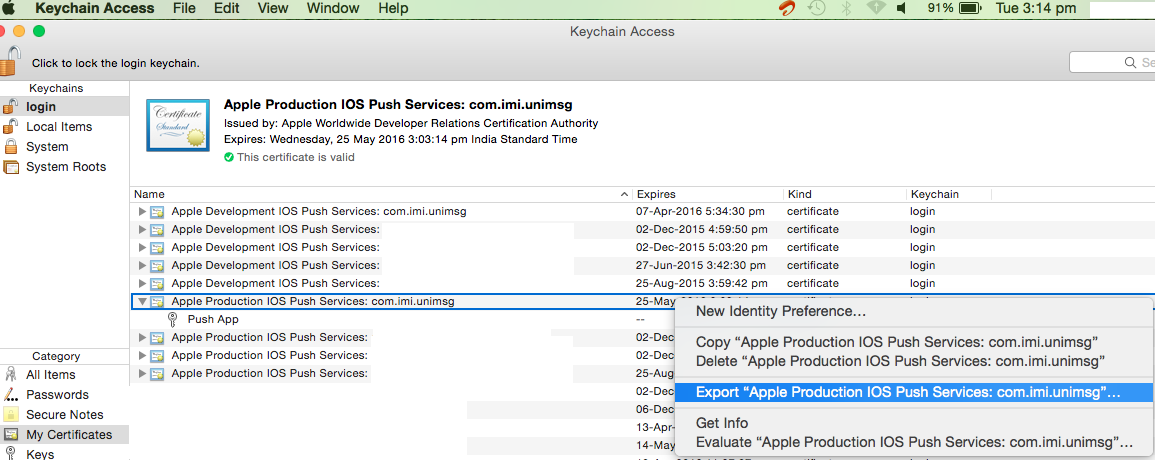
Figure 17: Adding certificate to Keychain
- A password screen appears. Click OK. The certificate must be saved without a password.
When the certificate is created, it is used in IMIconnect to configure push notification service.
Add Web Application in IMIconnect
To add a web application in IMIconnect, follow these steps:
- From the IMIconnect menu, click Apps. The Application screen appears.
- Click CONFIGURE APPS > MOBILE / WEB.
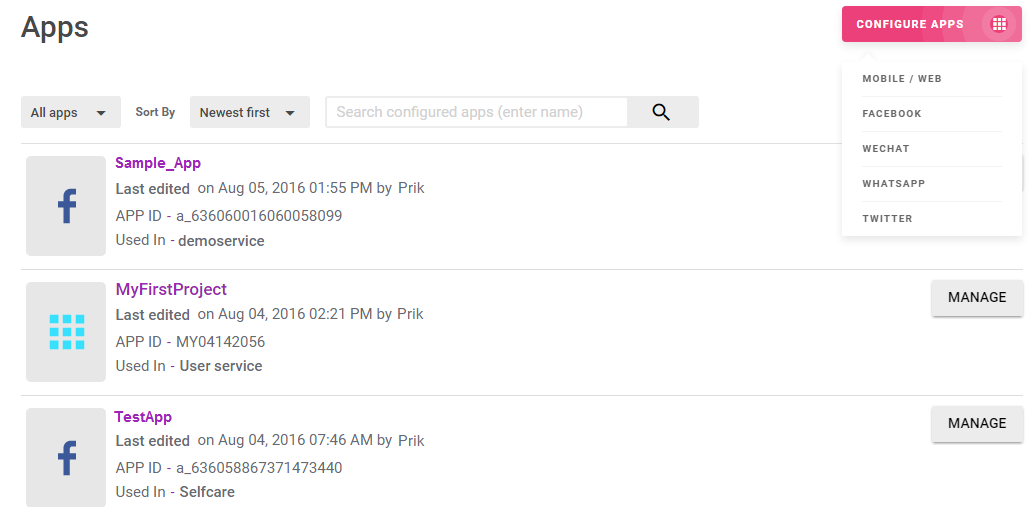
Figure 18: Adding to IMIconnect
- Enter the application name and click NEXT.

- Select the Web platform and click NEXT. Based on the selected platform, supported browsers screen appears.
- Select browser and click NEXT. The app configuration screen appears.
- Select Push Messaging or Real Time Messaging channel.
- Enter the following fields to configure Chrome and Firefox browsers:
a. Site Name: Enter the URL of the website to configure Web Push notification.
b. API Key: Enter the API key generated in the section Setup FCM for Chrome and Firefox Browsers.
c. Project number: Enter the project number generated in the section Setup FCM for Chrome and Firefox Browsers .
d. Notification Icon: Enter the path of the notification icon. The size of the icon should be 80x80.
e. Click Save.

Figure 19:Configuration screen for Chrome and Firefox browsers
- Enter the following fields to configure Safari browser:
a. Site Name: The name that is entered is displayed on the notification.
b. Site URL: The URL that is used to validate the identity of the website requesting push notifications using your ID. Only the website that matches with the URL can use your IMIconnect ID for push notifications.
c. APNs keys: Click the button to upload the .p12 file that is generated in the section Setup APNs for Safari Browser.
d. Password: Enter the password that is set while generating the certificate in the section Setup APNs for Safari Browser. Leave this field blank if the certificate was generated without a password.
e. Notification Icon: It is mandatory to upload all five icons. Click the respective buttons to upload the icons.
f. Click Save.
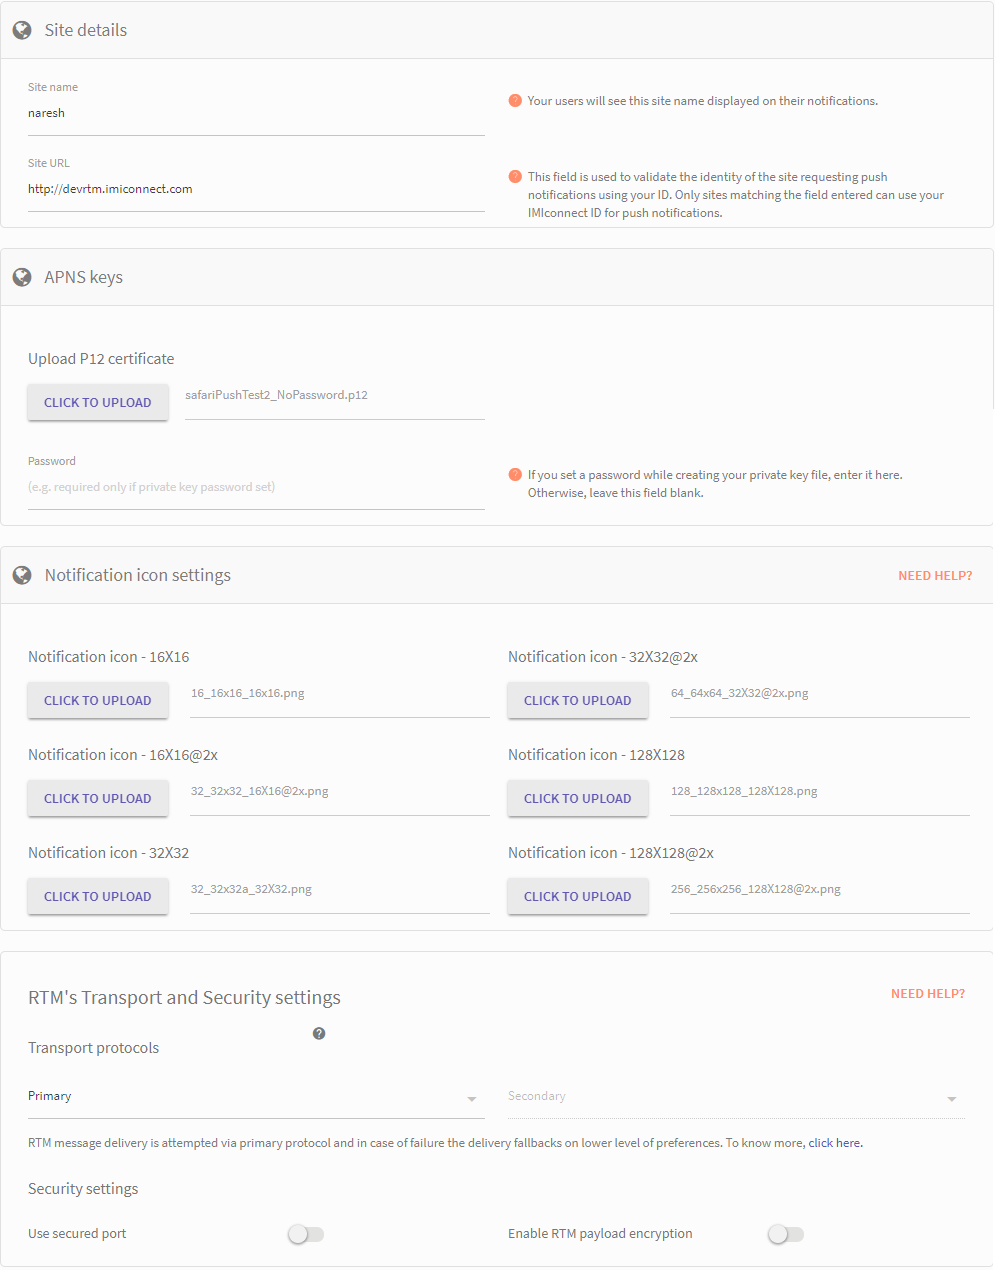
Configuration screen for Safari browser
- Configure RTM's Transport and Security settings.
| Feature | Settings |
|---|---|
| Real-time messaging | Transport protocols Two transport protocols are available for establishing RTM connection with IMIconnect. They are Web Socket and MQTT. You can configure them as primary and secondary. In case the connection is not established on primary protocol, it will fall back to secondary protocol. Security settings Enable secured ports to establish RTM connection on the secured port for MQTT and WebSocket as an extra layer of security. Enable RTM payload encryption to encrypt the RTM payload in transit. |
- Click Save.
A confirmation message appears when the application is created successfully.
Download and Integrate JavaScript SDK
- When the web app is added successfully, you can notice a DOWNLOAD link under Web configuration section. Click the link to download the JavaScript SDK.

Figure 20: App download page
- Extract the zip file, to a location in your local computer. You will notice js, manifest folders and sw.js file.
- Copy sw.js file, js, and manifest folder to the root folder of your web application.
- Copy the below code and paste it in header or body of your default web page. Replace appId with your actual value.
For example, to show the web push popup on loading the index.html page, copy the below code and paste it in header or body of your index.html page. Replace the appId with the id that is generated in IMIconnect for the web application.
<script src="../js/jquery.min.js"></script>
<script src="//www.gstatic.com/firebasejs/4.6.2/firebase-app.js"></script>
<script src="//www.gstatic.com/firebasejs/4.6.2/firebase-messaging.js"></script>
<script src="../js/mqttws31.js"></script>
<script src="../js/IMIClient.js"></script>
<script>
    try {
        var config = new IMI.ICConfig(appId, clientKey);
        IMI.IMIconnect.startup(config);

        if (!IMI.IMIconnect.isRegistered()) {
            var callback = {
                onSuccess: function() {
                    console.log("reg success");
                    //logic to subscribe to topics or publish messages
                },
                onFailure: function(errormsg) {
                    console.log("reg failed");
                }

            };
            var deviceProfile=new IMI.ICDeviceProfile(deviceId, userId);
           //here user id is  optional (If user id not there user can call deviceID,
             userId will be generated by IMIConnect and passed to callback function)//
          //var  deviceProfile = new IMI.ICDeviceProfile(deviceId);//
          IMI.IMIconnect.register(deviceProfile, callback);
        }
    } catch (err) {
        console.log(err);
    }
</script>
<script src="../js/jquery.min.js"></script>
<script src="../js/mqttws31.js"></script>
<script src="../js/IMIClient.js"></script>
<script>
    try {
        var config = new IMI.ICConfig(appId, clientKey);
        IMI.IMIconnect.startup(config);

        if (!IMI.IMIconnect.isRegistered()) {
            var callback = {
                onSuccess: function() {
                    console.log("reg success");
                    //logic to subscribe to topics or publish messages
                },
                onFailure: function(errormsg) {
                    console.log("reg failed");
                }

            };
            var deviceProfile=new IMI.ICDeviceProfile(deviceId, userId);
           //here user id is  optional (If user id not there user can call deviceID,
             userId will be generated by IMIConnect and passed to callback function)//
          //var  deviceProfile = new IMI.ICDeviceProfile(deviceId);//
          IMI.IMIconnect.register(deviceProfile, callback);
        }
    } catch (err) {
        console.log(err);
    }
</script>
Now the web push configuration is complete to display a popup when the default web page is loaded.
- When the web page is loaded a popup appears. When user clicks on Allow, unique ids are generated and stored in profile manager. The ids generated are:
| Browser | IDs |
|---|---|
| Chrome | chrome_pushid |
| Firefox | firefox_pushid and key |
| Safari | safari_pushid |
- To send messages without a customerid, you must use browser specific pushids.
Sending Push Messages to Customers
You can send push messages to customers in many methods. Below is one of them:
- When the customers click Allow button, the push details are stored in profile manager.
- Get the profiles based on appid using getAppProfile API. You will get all the browser specific push ids.
- Use Messaging API, to send push messages to the push ids.
Updated almost 3 years ago