Quickstart Guide
The IMIconnect Conversation system comprises a set of components which makes it easy for developers to integrate a fully featured chat experience within their application.
The document outlines the additional steps necessary to integrate the Conversation System of the IMIconnect SDK for Android within a host application and assumes the use of the Android Studio development environment.
Prerequisites
Before using the instruction below, the reader should have integrated the IMIconnect Core SDK for Android within their application. If the integration is not performed, please follow the Core Quickstart Guide
Note:
Ensure to configure Core SDK accurately.
Project Setup
Adding the UI SDK to your project
Open your project within Android Studio and follow the steps below.
Import the IMIconnectUI.aar
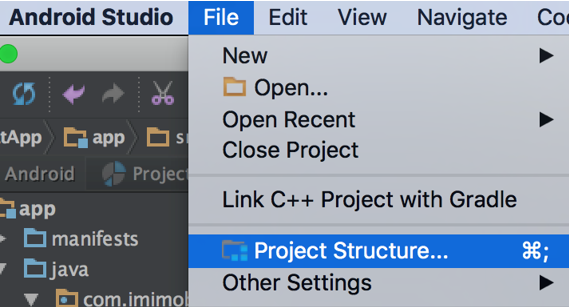
- Click File and select Project Structure.

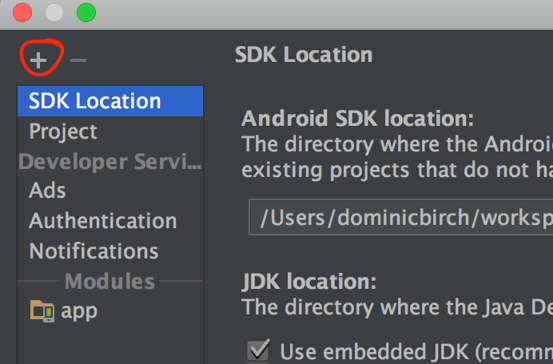
- Click

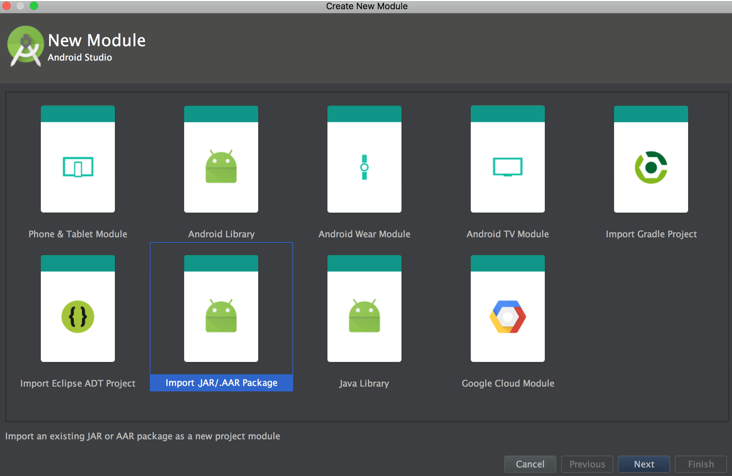
- Select import.JAR/.AAR Package and click Next to proceed.

- Click the File browse button

- Navigate and select IMIConnectUI.aar file.
6.Click OK > Finish > Ok.
Update app build.gradle
Open your app build.gradle and add the following dependencies
implementation project(':IMIconnectUI')

implementation 'com.squareup.picasso:picasso:2.5.2'
implementation 'com.android.support:design:28.0.0'
implementation 'com.android.support:support-v4:28.0.0'
implementation 'com.android.support:cardview-v7:28.0.0'
implementation 'com.android.support:appcompat-v7:28.0.0'
implementation 'com.android.support:recyclerview-v7:28.0.0'
implementation 'com.android.support:support-emoji:28.0.0'
implementation 'com.android.support:support-emoji-bundled:28.0.0'
implementation 'com.google.android.gms:play-services-places:16.0.0'
implementation 'org.jsoup:jsoup:1.11.2'
Note
The above statement assumes that your imported module is called IMIconnectUI, if you have used a different name during import then please adjust accordingly.
File provider
For creating file provider authority, follow the below steps
- Create an xml file (i.e: file_provider_paths.xml) in xml resources folder:
<?xml version="1.0" encoding="utf-8"?>
<paths xmlns:android="http://schemas.android.com/apk/res/android">
    <external-path
        name="external_files"
        path="."/>
</paths>
- Define a Provider, In your ApplicationManifest.xml, add this provider inside the application node
<provider
    android:name="android.support.v4.content.FileProvider"
    android:authorities="<your provider authority>"
    android:exported="false"
    android:grantUriPermissions="true">
    <meta-data
        android:name="android.support.FILE_PROVIDER_PATHS"
        android:resource="@xml/file_provider_paths"/>
</provider>
Just set your android:authorities, ie. com.imiconnect.demo.myfileprovider and then link the created xml resource file in android:resource
ProTip: Use ${applicationId}in android:authorities to automatically use your package name: ${applicationId}.YOUR_FILE_PROVIDER.
Add user permissions
In your ApplicationManifest.xml, add the below user permissions.
<!-- OPTIONAL add this permission if you wish to send or receive audio attachment messages -->
<uses-permission android:name="android.permission.RECORD_AUDIO"/>
<!-- OPTIONAL add this permission if you wish to use camera feature to send or receive Image or Video attachment messages -->
<uses-permission android:name="android.permission.CAMERA"/>
<uses-permission android:name="android.permission.WRITE_EXTERNAL_STORAGE"/>
<uses-permission android:name="android.permission.READ_EXTERNAL_STORAGE"/>
Configure Proguard Rules
Add the below rule in proguard-rules.pro file.
If you use an obfuscation tool other than ProGuard, please refer to the tool providers documentation for configuring equivalent rules.
-dontwarn android.support.design.**
-keep class android.support.design.** { *; }
-keep interface android.support.design.** { *; }
-keep public class android.support.design.R$* { *; }

-keep public class android.support.v7.widget.** { *; }
-keep public class android.support.v7.internal.widget.** { *; }
-keep public class android.support.v7.internal.view.menu.** { *; }

-keepclassmembers class * extends android.support.v7.widget.RecyclerView.ViewHolder {
    public <init>(android.view.View);
        <methods>;
 }

-keep public class * extends android.support.v7.widget.RecyclerView$LayoutManager {
    public <init>(...);
}

-keep public class * extends android.view.View {
public <init>(android.content.Context);
public <init>(android.content.Context, android.util.AttributeSet);
public <init>(android.content.Context, android.util.AttributeSet, int);
public void set*(...);
}
Implementation
Initialise the UI SDK
The SDK must be initialized before attempting to use any of its features. The SDK initialization should be done from your Application.onCreate method.
NOTE: Ensure to configure Core SDK accurately.
IMIconnectUI.startup(this, new ICUIConfig(<your provider authority
>), new ICUIStartupCallback()
{
   @Override
   public void onStartupComplete(final ICException e)
   {
      if (e != null)
      {
         Log.e("IMIconnectUI", "Failed to initialize UI SDK", e);
      }
   }
});
Configure a message store
The Conversation System UI components require that a valid message store is configured prior to the components being used. The Core SDK provides default implementations which can be used out of the box.
The following code creates an ICDefaultMessageStore instance and passes it to ICMessaging to enable message store functionality. You should place this code in your Application.onCreate method immediately after the IMIconnect.startup method call.
ICMessaging.getInstance().setMessageStore(new ICDefaultMessageStore(this));
Configure Categories
Categories define the contact points within your organisation and allow you to segregate conversations within the platform. Categories are presented to the user as a list and selection of a category is required to start a new conversation. For example, you wish to allow the user to contact a number of different departments, each of these departments would be represented by a category.
You configure categories by creating instances of the ICConversationCategory class.
List<ICConversationCategory> categories = new ArrayList<>();
Uri imageUri; //Assign a Uri instance to a local image resource

categories.add(new ICConversationCategory("Sales", imageUri));
categories.add(new ICConversationCategory("Technical Support", imageUri));
A valid list of categories is required in order to launch the Conversation Activity in the next section.
Launch the Conversation Activity
The UI SDK provides several components which can be used to integrate a chat experience within your application, the components you choose to use will depend on how much customisation you require. For the purposes of this guide, we will use the high-level ICConversationActivity component which provides a chat experience with minimal code.
The Conversation Activity can be launched in one of two modes of operation:
- Display a Conversations List which displays all of the users current and past conversations. In this mode, users may select a conversation to view messages, and/or respond to them, and create new conversations.
- Directly display a conversation to allow a user to view messages, and/or respond to them.
Open the Conversations List
To launch the Conversations Activity to display a list of conversations, use the following method:
ICConversationActivity.start(Context context, ArrayList<ICConversationCategory> categories, ICCustomerDetails customerDetails, Bundle extArgs)
This method variant requires a list of categories, which will be displayed to the user when they wish to start a new conversation, customer details object and bundle with extra arguments.
The following code snippet illustrates how to use the method.
List<ICConversationCategory> categories = new ArrayList<>();
Resources resources = context.getResources();

Uri imageUri; //Assign a Uri instance to a local image resource

categories.add(new ICConversationCategory("Sales", imageUri));
categories.add(new ICConversationCategory("Technical Support", imageUri));
ICCustomerDetails customerDetails = ICCustomerDetails.builder().setFirstName("John").setLastName("Doe").build();
Bundle bundle = new Bundle();
ICConversationActivity.start(context, categories, customerDetails, bundle);
Open a Conversation Directly
To launch the Conversations Activity to directly display a conversation, use the following method variant:
ICConversationActivity.start(Context context, String conversationId, Bundle extArgs)
This method variant requires a valid conversationId that identifies the conversation to open.
Note
The value of the conversationId can be obtained from an ICThread instance that is exposed by the Core SDK.
The following code snippet enables you to launch the Conversation Activity to open a conversation directly:
ICConversationActivity.start(context, conversationId, bundle);
Message Synchronization (optional)
To provide the best user experience, the Core SDK provides synchronization of messages across devices. This is useful to obtain message history when a user installs the application to a new device.
Message synchronization is managed by the Core SDK but will only function when a message store has been set and a valid synchronization policy is provided.
Configure Synchronization Policy
The ICMessageSynchronizationPolicy class allows you to configure various options to limit how much data is synchronized. For the purposes of this guide, we will enable full synchronization.
The following code snippet enables the synchronization of the full user message history.
ICMessageSynchronizationPolicy policy = new ICMessageSynchronizationPolicy();

policy.setMode(ICMessageSynchronizationMode.Full);

ICMessageSynchronizer.setPolicy(policy);
Updated about 3 years ago