Flow: Send
This node is used to send messages to customers through the channels that are configured within a service. As the configuration of each channel differs, the options available will depend on the selected channel.
To create a service, from the Settings dashboard, click on Numbers and select the Shortcodes, Keywords and Phone numbers previously bought on the platform. These can be mapped to a service in number settings.
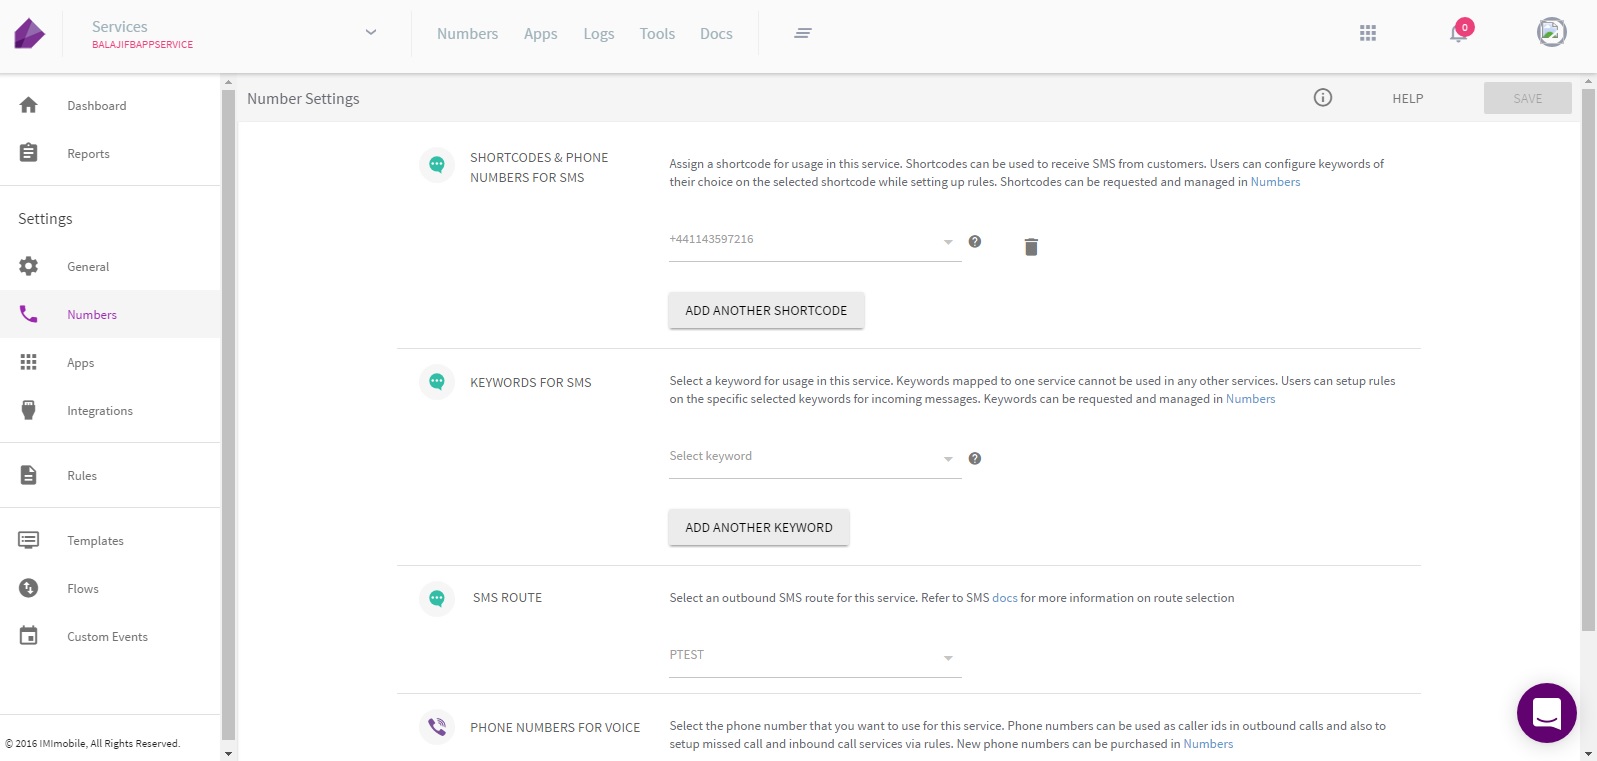
Figure 1: Number Settings
Once a service is created, you can configure the required channels from the settings screen. These channels are then displayed in the Send node screen. Following channels are supported:
SETTINGS
The node specific configuration is accessed by double-clicking on the node. This screen displays the channels that are configured for the service.
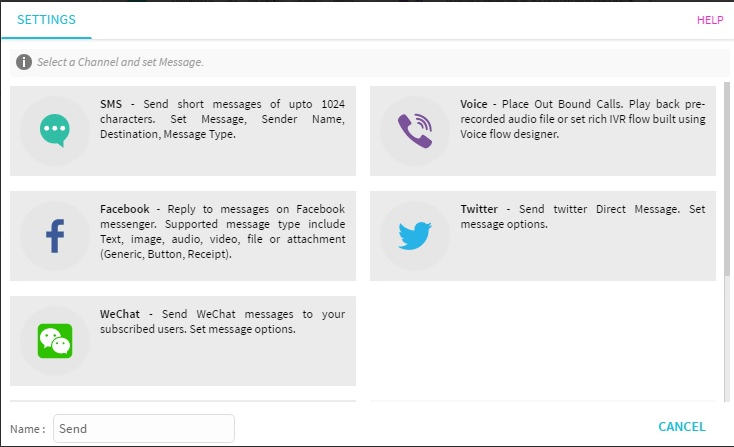
Figure 2: Settings
SMS
The SMS channel is used to send short messages of upto 1024 characters, using the parameters shown in Figure 3.

Figure 3: Send Node
The below screen appears when the SMS channel is selected.
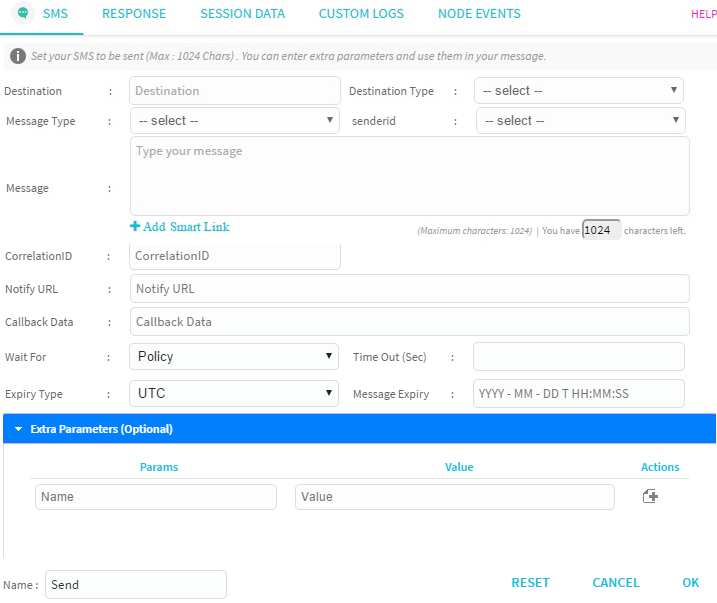
Figure 4: SMS
The parameters of SMS channel are:
Field | Description |
|---|---|
Destination | A value or Session Data variable used to do perform a user profile lookup in order to access all possible channels associated with the user. This should correspond with the Destination Type field. |
Destination Type | This parameter specifies the destination type of the information entered in the Destination parameter. This list below shows supported values for the Destination Type parameter:
|
Message Type | Specifies the message type. The options are:
|
senderId | Select the senderId from the drop-down using which the message is sent. |
Message | The content of the message to be sent. If applicable, message length restrictions will be displayed. |
Add Smartlink | Add a Smartlink and select the Smartlink that is created using IMIconnect. |
Link Validity (in Mins) | Specify the time in minutes after which the Smartlink will expire. |
CorrelationID | Should be passed to the flow from the event that invoked it and it has to be passed back in all the call back or notify. |
Message Expiry (UTC) | Expiry time in UTC format, after which messages should will not be pushed. |
Wait For | Select from one of the options:
Depending on the selected option, a Time Out (Sec) option will be displayed. |
| Notify URL | It is used to post the information about the transaction and returns the delivery receipt in JSON format.For more details on example, see code sample below. |
| Callback Data | Request-specific data that must be returned to the user whenever they are notified via notify URL. |
| Name | The name of the node is represented as a string. Enter a new name or continue with the displayed name. |
{
    "deliveryInfoNotification": {
        "deliveryInfo": {
            "deliveryChannel": "SMS",
            "Description": "Delivered",
            "destinationType": "msisdn",
            "timeStamp": "2016-07-20T17:13:17.908",
            "code": "7500",
            "deliveryStatus": "Delivered",
            "destination": "918886661353"
        },
        "correlationid": "4eef-92ca-79fd0250c4a3-262895e4-2217",
        "callbackData": "return callbackdata",
        "transid": "262895e4-2217-4eef-92ca-79fd0250c4a3"
    }
}
{
  "deliveryInfoNotification": {
    "deliveryInfo": {
      "deliveryChannel": "SMS",
      "pushId": "",
      "Description": "Message expired",
      "destinationType": "msisdn",
      "timeStamp": "2016-07-28T11:47:56.459",
      "code": "7208",
      "deliveryStatus": "Un-Delivered",
      "deviceid": "",
      "destination": "910000000001"
    },
    "correlationid": "",
    "callbackData": "",
    "transid": "8f0fd088-2a80-43e3-9da1-e82e52b17390"
  }
}
{
    "deliveryInfoNotification": {
        "deliveryInfo": {
            "deliveryChannel": "SMS",
            "pushId": "",
            "Description": "Unknown Status",
            "destinationType": "msisdn",
            "timeStamp": "2016-07-28T11:47:56.459",
            "code": "7200",
            "deliveryStatus": "Failed",
            "deviceid": "",
            "destination": "919908505526"
        },
        "correlationid": "",
        "callbackData": "",
        "transid": "f040fe8b-2876-4824-b59e-44420047e204"
    }
}
VOICE
You can initiate a Integrated Voice Response (IVR) voice call with a customer. When call is initiated, you can seek the response of the customer from his keypad. Based on the response, an appropriate flow is continued. You can configure a wait time in minutes to receive the customer response. The call may end if the response is not received within the wait time. For example, when a bank initiates an IVR voice call with its customer on credit card offers, based on the customers response, an SMS can be sent to the sales team or customer support team. If the customer does not respond within a specified time, then the call gets disconnected.
The below screen appears when the Voice channel is selected.

Figure 5: Voice
The parameters of Voice channel are:
Field | Description |
|---|---|
Destination | A value or Session Data variable used to do perform a user profile lookup in order to access all possible channels associated with the user. This should correspond with the Destination Type field. |
Destination Type | This parameter specifies the destination type of the information entered in the Destination parameter. Following are the options:
|
Message Type | The options are:
|
Media | Select the Flow ID or Media file based on the option selected in Message Type. |
Wait For | The options are:
Depending on the selected option, a Time Out (Sec) option will be displayed. |
| senderid | The available Sender ID associated with the Service will be available from the drop-down menu. |
| Extra Parameters (Optional) | Enter the Parameter and Value. |
RTM
You can send an RT message with attachment and Smartlink with an expiry time in minutes. When the Smartlink is configured with an expiry link, the link will expire if it is not clicked within the configured expiry time.
The image below shows the RTM channel and the properties that are required to be configured.
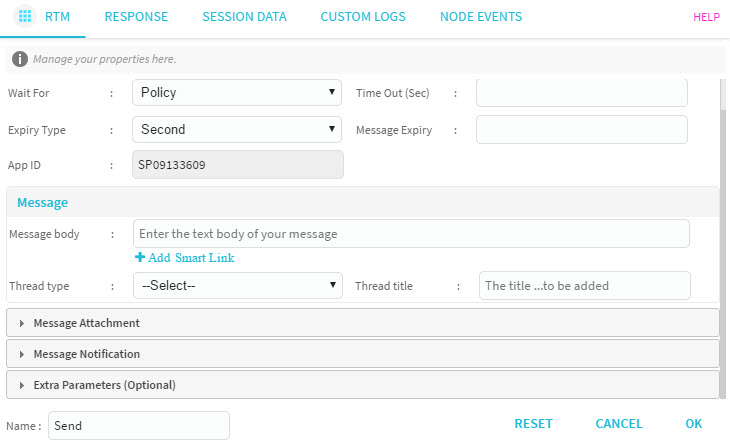
Figure 6: RTM
Table below defines the parameters in the RTM channel.
Field | Description |
|---|---|
Destination | A value or Session Data variable used to do perform a user profile lookup in order to access all possible channels associated with the user. |
Destination Type | This parameter specifies the destination type of the information entered in the Destination parameter.
|
Wait For | The options are:
|
| App ID | This parameter displays a read-only value. It specifies the app ID. |
MESSAGE
This tab helps you configure a message.
The image below displays the message tab and the properties that are required to be configured.

Figure 7: Message
Field | Description |
|---|---|
Message body | Enter a message. |
Add Smart Link | Add the smart link that is created using IMIconnect. Toggle the status to ON, for the smart link to be visible in the drop-down. |
Link Validity (in Mins) | Enable the Link Validity checkbox, to set the duration for which the Smart Link would be active. |
Thread type | Select from one of the following options in the drop-down:
|
Thread title | Enter a title for the thread.
|
Message Attachment
Clients can upload attachments that can be sent in the inbound and outbound messages. Clients can either choose to send the attachment links directly or use media ID.
Each client will be assigned a s3 bucket where the attachment will be stored with a unique media ID. Only one media ID per message should can be allowed while sending, whereas, incoming messages from customers can include multiple attachments.

Figure 8: Message Attachment
Field | Description |
|---|---|
Select attachment type | Select from the available list of attachment types:
|
| Attachment URL | Enter an URL for the attachment. |
| Attachment Size | Specifies the size of attachment, a maximum of 4kb file can be uploaded. |
| Attachment play duration | Specifies the duration (in seconds) after which the play duration will expire. |
| Preview | Applicable when the content type is video. Specifies a base64 string of a JPEG image to display as a preview for video. |
Message Notification
A message notification is delivered to a device (iOS, Android, or Web) when a connection is established on a device.
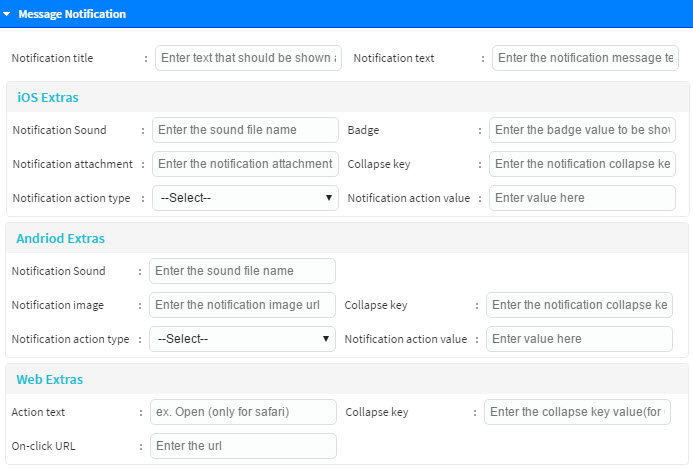
Figure 9: Message Attachment
Field | Description |
|---|---|
Notification title | Text that should be displayed as notification. |
Notification text | Message that should be displayed in the notification text. |
iOS Extras | The following parameters must be configured:
|
Android Extras | The following parameters must be configured:
|
Web Extras | The following parameters must be configured:
|
| Image URL | Specifies the image URL. |
Interactions
This tab helps you configure the parameters to make the message interactive.
The image below shows the Interactions tab and the properties that are required to be configured.
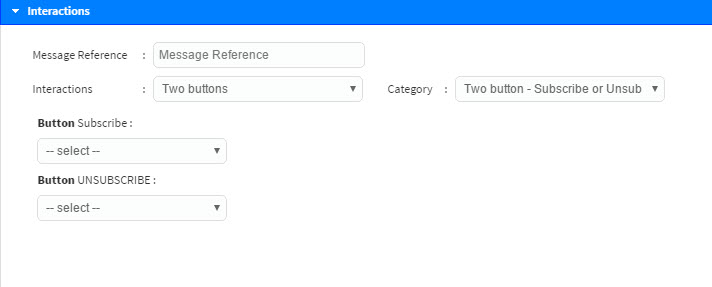
Figure 8: Interactions
Field | Description |
|---|---|
Message Reference | Provide a reference value if the results of the RTM interaction is required as a trigger for rules. |
Interactions | Specifies the number of interactive buttons for the message. The options are:
|
| Category | Specifies the category for the selected interactive button. |
| Button | Specifies the action when single or two buttons is selected. For example, if single button is selected in the Interactions list and single button - subscribe is selected in the category list, then the button display takes the value of category and is displayed as Button Subscribe. |
| Button | Specifies the category value when two buttons is selected from the Interactions list. |
Extra Parameters(Optional)
This tab helps you configure extra parameters of the message.

Figure 9: Extra Parameters
| Field | Description |
|---|---|
| Param | Specifies the parameter for the extras block. |
| Value | Specifies the value for the defined parameter |
| Actions | Allows addition of a new parameter. |
FACEBOOK
You can send a Facebook message with attachments and Smartlink with an expiry time in minutes. When the Smartlink is configured with an expiry link, the link will expire if not clicked within the expiry time.
The below screen appears when the Facebook channel is selected.
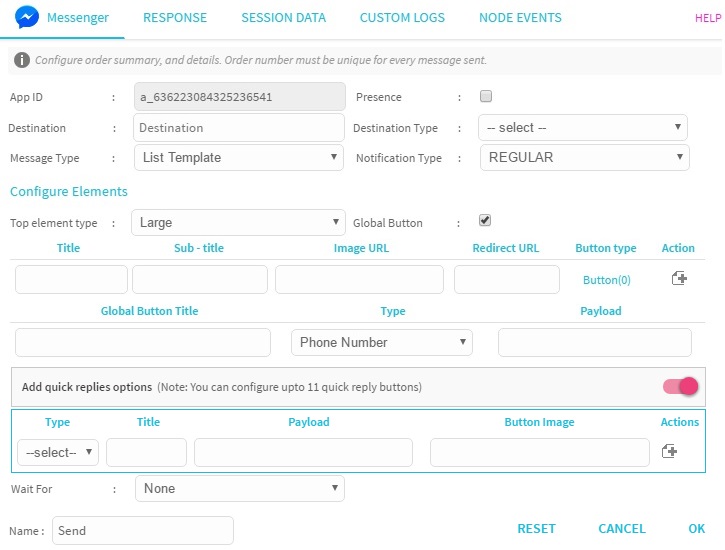
Figure 10: Messenger
The parameters of Facebook channel are:
Field | Description |
|---|---|
App ID | The App ID field should already be populated with the Facebook App ID configured for this channel. |
Presence | Select the checkbox to verify whether the user is present at that moment before sending message. |
Destination | A value or Session Data variable used to do perform a user profile lookup in order to access all possible channels associated with the user. This should correspond with the Destination Type field. |
Destination Type | This parameter specifies the destination type of the information entered in the Destination parameter. Following are the options:
|
Message Type | Select the message type from the drop-down. The options are:
|
Notification Type | Specifies how the notification is delivered. The options are:
|
Message | Specifies the content of the message to be sent. |
Smartlink | Select the Smartlink that is created using IMIconnect. |
Link Validity (in Mins): | Specify the time in minutes after which the Smartlink will expire. |
Attachment URL | This option is appears when the Message Type is selected as Image or Audio or Video. Enter the URL of the attachment. |
Message Type > Generic Template: Configure bubbles | Additional options are displayed when the Message Type is selected as Generic Template. The options are:
|
Message Type > Button Template: Configure buttons | Additional options are displayed when the Message Type is selected as Button Template. The options are:
|
Message Type > Receipt Template | This option is displayed when the Message Type is selected as Receipt Template. The options are:
|
Message Type > List Template | Allows you to present a set of items vertically. Configure Elements consists of the following list of parameters:
|
Global Button | If enabled, this button is rendered below the item list. Configure the following parameters:
|
Add quick reply options | To provide a way to present buttons to the user in response to a message, enable the button and configure the following parameters:
|
Add quick replies options | Enable the button to configure quick replies.
|
Wait For | The options are:
Depending on the selected option, a Time Out (Sec) option will be displayed. |
TWITTER
You can send a Twitter message with attachments and Smartlink with an expiry time in minutes. You can configure the link to expire if not clicked within the expiry time.
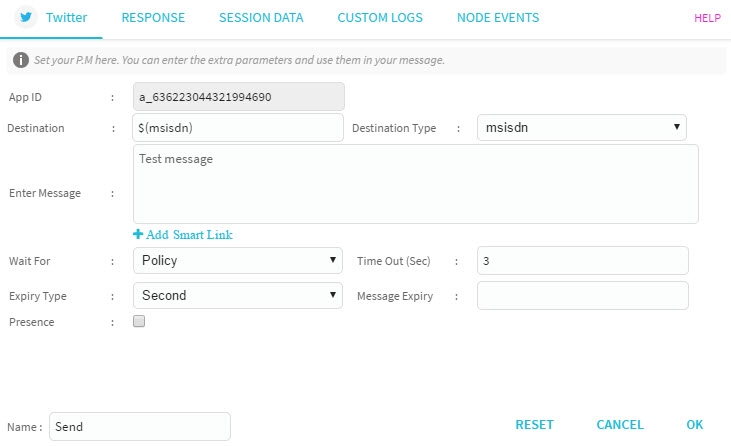
Figure 11: Twitter
The parameters of Twitter channel are:
Field | Description |
|---|---|
App ID | The App ID field should already be populated with the Twitter App ID configured for this channel. |
Destination | A value or Session Data variable used to do perform a user profile lookup in order to access all possible channels associated with the user. This should correspond with the Destination Type field. |
Destination Type | This parameter specifies the destination type of the information entered in the Destination parameter. Following are the options:
|
Enter Message | The content of the message to be sent. If applicable, message length restrictions will be displayed. |
Smartlink | Select the Smartlink that is created using IMIconnect. |
Link Validity (in Mins): | Specify the time in minutes after which the Smartlink will expire. |
Wait For | The options are:
Depending on the selected option, a Time Out (Sec) option will be displayed. |
| Presence | Select the checkbox to verify whether the user is present at that moment before sending message. |
| Extra Parameters (Optional) | Enter the Parameter and Value. Click + to add additional parameters. |
WeChat
You can send a WeChat message with attachments and Smartlink with an expiry time in minutes. You can configure the link to expire if not clicked within the expiry time.
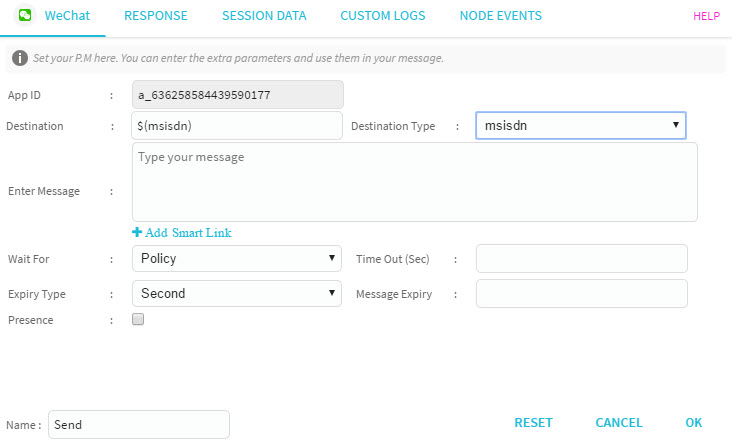
Figure 13: WeChat
The parameters of WeChat channel are:
Field | Description |
|---|---|
App ID | The App ID field should already be populated with the WeChat App ID configured for this channel. |
Destination | A value or Session Data variable used to do perform a user profile lookup in order to access all possible channels associated with the user. This should correspond with the Destination Type field. |
Destination Type | This parameter specifies the destination type of the information entered in the Destination parameter. Following are the options:
|
Enter Message | The content of the message to be sent. If applicable, message length restrictions will be displayed. |
Smartlink | Select the Smartlink from the drop-down that is created using IMIconnect. |
Link Validity (In Mins) | Specify the time in minutes after which the Smartlink will expire. |
Wait For | The options are:
Depending on the selected option, a Time Out (Sec) option will be displayed. |
| App ID | The App ID field should already be populated with the App ID configured for this channel. |
| Presence | Select the checkbox to verify whether the user is present at that moment before sending message. |
PUSH NOTIFICATION
This screen allows you to configure push notification for iOS and Android platforms.
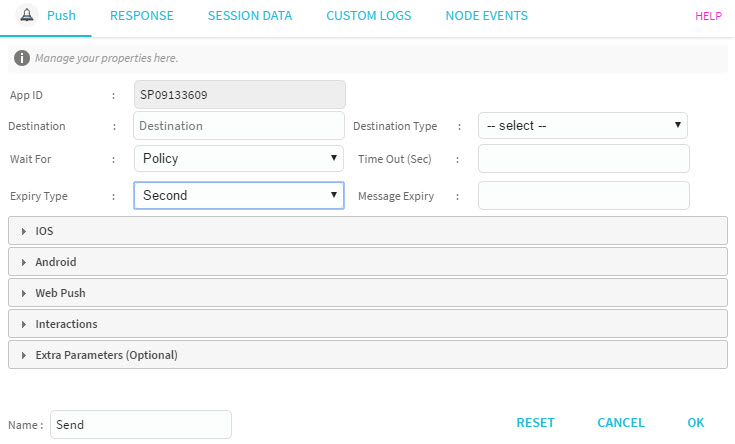
Figure 14: Push
The parameters of Push Notification channel are:
Field | Description |
|---|---|
App ID | The App ID field should already be populated with the App ID configured for this channel. |
Destination | A value or Session Data variable used to do perform a user profile lookup in order to access all possible channels associated with the user. This should correspond with the Destination Type field. |
Destination Type | This parameter specifies the destination type of the information entered in the Destination parameter. Following are the options:
|
Wait For | The options are:
Depending on the selected option, a Time Out (Sec) option will be displayed. |
| Presence | Select the checkbox to verify whether the user is present at that moment before sending message. |
iOS
This screen allows you to configure push notifications for iOS platform.
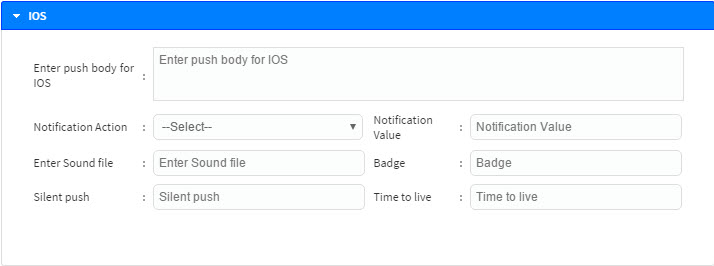
Figure 15: Push: iOS
The configuration options for iOS platform are:
Field | Description |
|---|---|
Enter push body for IOS | Specifies the iOS specific push message. |
Notification Action | Specifies the notification action. The actions are:
|
Notification Value | Specifies value of the notification action selected. |
Enter Sound file | Custom sound that should be played when the notification is delivered. |
Badge | The number to be displayed as badge of the app icon. |
Silent push | The customer will not be notified of the notification delivery, but the app gets the notification if this attribute is true. The options are:
|
| Time to live | Expiration time for the message delivery. |
Android
This screen allows you to configure push notification for Android platform.
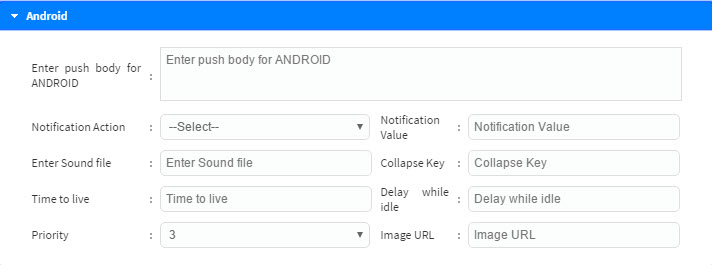
Figure 16: Push: Android
The configuration options for Android platform are:
Field | Description |
|---|---|
Enter push body for Android | Android specific push message text. |
Notification Action | Specifies the notification action. The actions are:
|
| Notification Value | Specifies value of the notification action selected. |
| Enter Sound file | Custom sound will be played when the notification delivered. |
| Collapse Key | An arbitrary string that is used to break up a group of like messages when the device is offline, the oldest message is discarded and only the last message is sent to the customer. |
| Time to live | Time limit before delivery attempts for undelivered messages stop and the messages are discarded. |
| Delay while idle | If true, the message delivery is delayed when the customer’s device is idle. |
| Priority | A value from 1 to 5, where 5 is the highest. |
| Image URL | Enter the URL for the image. |
###Interactions
The image below allows users to configure the parameters in the interactions tab.
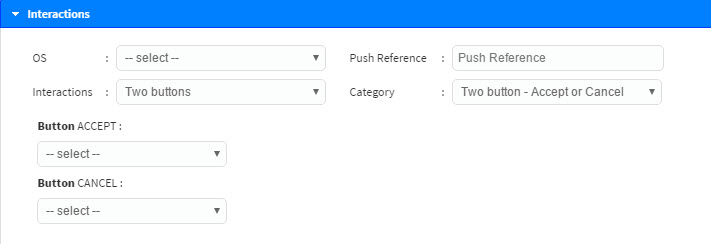
Figure 17: Push: Interactions
Table below defines the configuration options for interactive buttons.
Field | |
|---|---|
OS | The options are:
|
Push reference | Provide a reference value if the results of the push interaction is required as a trigger for rules. |
Interactions | Specifies the type of interaction. The options are:
The chosen option will affect the subsequent options available in the Category field. |
| Category | Each category has a specific context and associated set of actions. The table that follows details options available in the Category field depending on the selection in the Interaction field. |
Generic Actions for Category options
Table below displays the actions applicable to Single button or Two button interactions.
| Generic Actions | Action Parameter | Description |
|---|---|---|
| OPENURL | URL | Opens a URL. |
| OPENAPP | NONE | Opens an application. |
| DEEPLINK | link | Deep link a page on an app. |
| OPENWEBVIEW | URL | Opens a URL in a Webview. |
| SHARE | URL or TEXT | Opens share intent in your app. |
Category: Single button
| Catergory option | Button assignment |
|---|---|
| Single button - Dismiss | DISMISS |
| Single button - Subscribe | Any from the Generic Actions table. |
| Single button - Unsubscribe | Any from the Generic Actions table. |
| Single button - Share | Any from the Generic Actions table. |
| Single button - Open | Any from the Generic Actions table. |
Category: Two buttons
| Catergory option | Button (1) assignment | Button (2) assignment |
|---|---|---|
| Two button - Yes or No | Yes:Any from the Generic Actions table. | No:Any from the Generic Actions table. |
| Two button - Accept or Cancel | Accept:Any from the Generic Actions table. | Cancel:DISMISS |
| Two button - Share or Cancel | Share:Any from the Generic Actions table. | Cancel:DISMISS |
| Two button - Shopnow or Cancel | Shop now:Any from the Generic Actions table. | Cancel:DISMISS |
| Two button - Later or Now | Later:DISMISS | Now:Any from the Generic Actions table. |
| Two button - PlayNow or PlayLater | Play Now:Any from the Generic Actions table. | Play Later:DISMISS |
| Two button - Ok or Learn More | Ok:Any from the Generic Actions table. | Learn More:Any from the Generic Actions table. |
| Two button - Subscribe or Unsubscribe | Subscribe:Any from the Generic Actions table. | Unsubscribe:Any from the Generic Actions table. |
| Two button - Buy Now or Buy Later | Buy Now:Any from the Generic Actions table. | Buy Later:DISMISS |
| Two button - Like or Share | Like:Any from the Generic Actions table. | Share:Any from the Generic Actions table. |
Extra Parameters (Optional)
Enter the Parameter and Value. Click + to configure additional parameters.

Figure 18: Push: Extra Parameters
EMAIL
Users' can send email through a node in two ways:
- Text (only plain text)
- Templates (from template builder)
All emails will be sent from Connect using Amazon SES via API calls, with the email content formatted as HTML and sent as an API parameter. Once the user selects the available template, all the replaceable parameters from the template are loaded; the user can now map them to session variables in the flow.
From the settings screen as shown below, select Email channel.
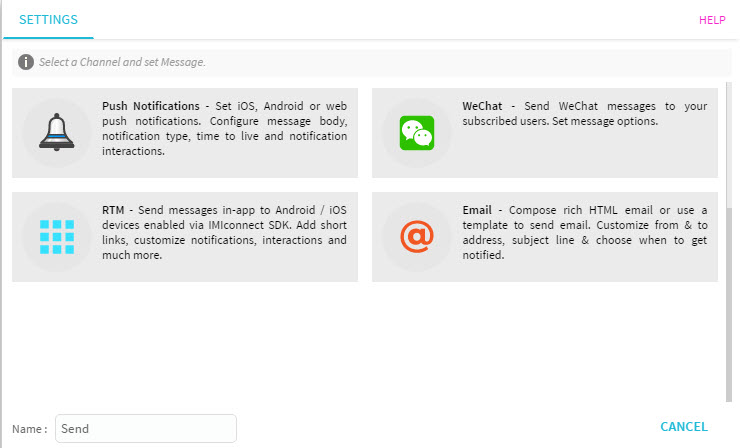
Figure 19: Settings: Email
The node specific configuration is accessed by double-clicking on the email node.

Figure 20: Email Node
The key-values to be extracted / translated from the input data set and the corresponding output is configured using these settings.
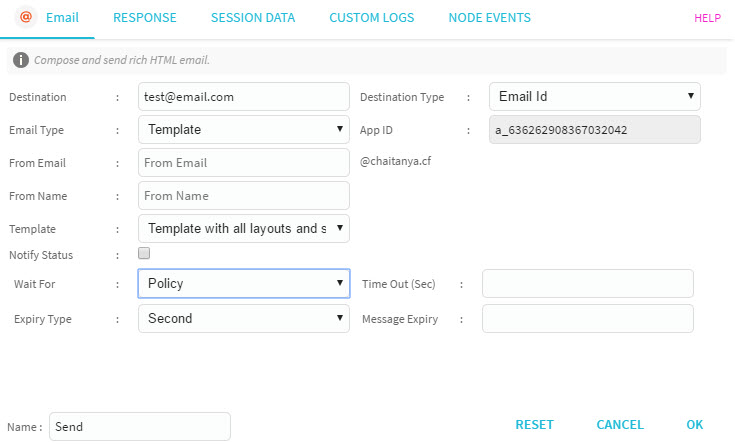
Figure 4: Compose Email
The table below describes the configuration settings.
Field | Description |
|---|---|
Destination | Destination email address. |
Email Type | Select Text or Template. |
From Email | Senders' email address. |
From Name | Senders' name. |
Template | Select custom template created in Template Composer. |
Notify Status | If checked, provides notification status. |
Notify URL | URL through which one or more of the checked items is notified:
|
Wait For | Select one of the following:
|
| Destination Type | Select the destination type; for example, Email ID. |
| App ID | Displays the application ID. |
NODE EVENTS
| Exit event | Description |
|---|---|
| onsuccess | This event is triggered if the node completes successfully. |
| onsubmit | This event is triggered when the message is submitted to the channel gateway. |
| ondrsuccess | This event is triggered when a Delivery Report is received from the channel gateway. |
| onpolicysuccess | This event is triggered if Policy check is successful. |
| onread | This event is triggered if the read event is received before the specified timeout and the Wait For field is set to 'Read'. |
| ontimeout | This event is triggered if a configured timeout is reached. |
| ondrfail | This event is triggered when the message failed to deliver it to the recipient. |
| onpolicyfail | This event is triggered if the Policy check fails. Error code and description:7120 - This error code appears when the payload size exceeds 5Kb. |
| onerror | This event is triggered if an error occurs. |
RESPONSE
Response tab allows you to configure the channels response to be stored into session data.
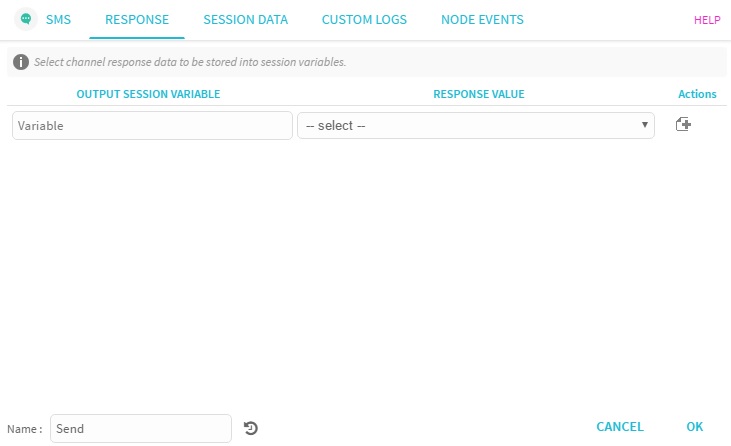
Figure 15: Response
For example, you can store the MO response of a channel into your session data.
SESSION DATA
For information on session data, click here .
CUSTOM LOGS
For information on custom logs, click here.
Updated almost 3 years ago