RESTful API Node
There are two tabs, API and NODE UI on the page. In the API tab, you can define the fix value parameters. The NODE UI tab will let you configure the ‘dynamic’ specified parameters, for which the field type has to be configured in the page. The NODE UI page also allows you to group the parameters in different groups.
Configuring a RESTful API node
Custom Node RESTful API supports GET, POST, PUT, and DELETE operations
To create a RESTful Node
- On the services dashboard, click Integrations
- On the New Customer node pop-up, select REST and then click Next to proceed.
- Define the NODE PROFILE
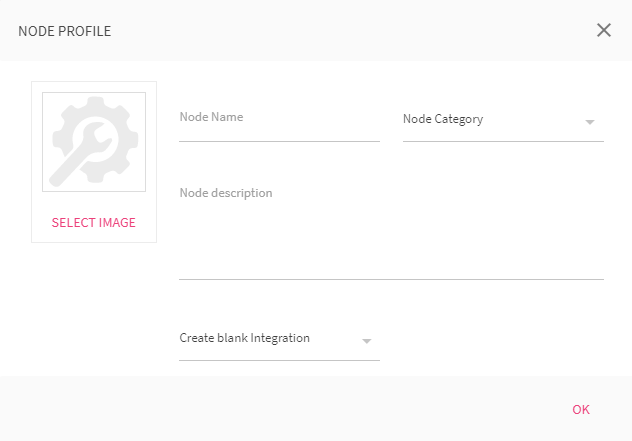
- Enter a Name for the node
- Choose a Node Category from the drop-down menu.
- Enter the Description of the node you are creating.
- Upload a representational image for the Node(Optional.)
- Choose Create Blank Integration from the drop-down menu.
- Click OK to proceed.
Adding a Method
You can add as many methods as you want, based on the node requirement. A method has to be supplied with information to make it operational. You might notice that some content is dynamic with the options selected.
| Field | Description |
|---|---|
| Parameter | Request parameter of the API |
| Parameter value type | Static: When selected, you need to enter the value of the request parameter Dynamic: When selected, the request parameter is available in the node UI to configure the parameter and this parameter will accept input in the runtime. |
| Field name/Parameter value | Option is determined by selection of 'Parameter value type' Static = Parameter value : Enter the static value Dynamic= Field name: Enter the field name to display at the runtime. |
Request Details
Enter the basic details about the API
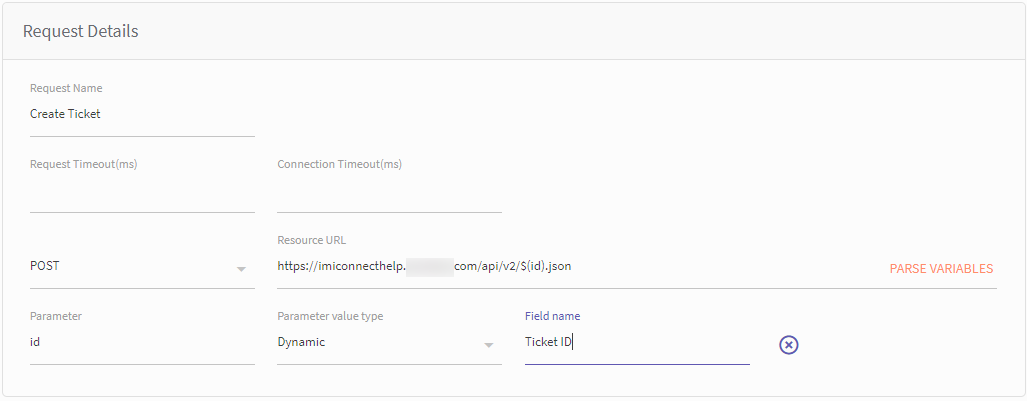
a. Enter the Method Request Name
b. Enter the Description of the Request Name
c.Select the Method type
d. Enter the method Resource URL.
(Change the default variable notation with the imiconnect variable; eg $() )
e. Click Parse variable to list down the dynamic component.
f. Setup the dynamic fields to supply data during runtime.
- Enter the Field Name and the Key,
- Enter the validation criteria and define the validation type.
Authorization
Authorization has a list of authorization type to manage the API requirements. Choose an authorization type and configure the authorization details.
NO AUTH
Select this option when you don’t need an authorization parameter to send a request.
BASIC AUTH
Basic Auth requires a verified username and password to access a data resource.
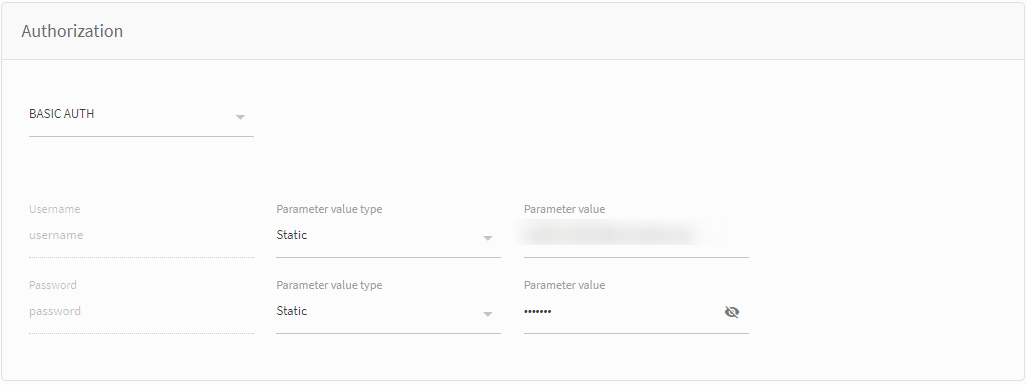
| Field | Description |
|---|---|
| Username/Password | API parameters for Username and password |
| Parameter value type | Type of Parameter: Dynamic or static |
| Field name/Parameter value | Enter the Field name for the Dynamic parameter. Enter value for Static parameter |
DIGEST AUTH
In digest authentication type, the client sends a request to a server, which sends back nonce and realm values for the client to authenticate. The client sends back a hashed username and password with nonce and realm. The server then sends back the requested data.
| Parameter | Description |
|---|---|
| Username | Username to authorization the request |
| Realm | A string specified by the server in the www-Authenticate response header. |
| Password | Password to authorization the request |
| Nonce | A unique string specified by the server in the www-Authenticate response header. |
| Algorithm | A string that indicates a pair of algorithms used to produce the digest and a checksum. |
| qop | The quality of protection applied to the message. The value must be one of the alternatives specified by the server in the www-Authenticate response header. |
| Nonce Count | The hexadecimal count of the number of requests (including the current request) that the client has sent with the nonce value in this request. The count must be specified if a qop directive is sent, and must not be specified if the server did not send a qop directive in the www-Authenticate response header. Postman always sends 00000001 as the nonce count. |
| Client Nonce | An opaque quoted string valued provided by the client and used by both client and server to avoid chosen plaintext attacks to provide mutual authentication and to provide some message integrity protection. The count must be specified if a qop directive is sent, and must not be specified if the server did not send a qop directive in the www-Authenticate response header. |
| Opaque | This is a string of data specified by the server in the www-Authenticate response header and should be used here unchanged with URLs in the same protection space. We recommend this string be base64 encoded data. |
AWS Signature
AWS is the authorization workflow for Amazon Work Services requests. AWS users must use a custom HTTP scheme based on a keyed-HMAC (Hash Message Authentication Code) for authentication.
| Parameter | Description |
|---|---|
| AccessKey | Each user has a access key for a account that is required to send request. |
| SecretKey | Each user has a secret key for a account to send request. |
| AWS Region | The region receiving the request. |
| Service Name | The service receiving the request. |
OAuth 2.0
OAuth 2.0 is an authorization type that enables you to approve an application that contacts another application for you without exposing your password.
| Parameter | Description |
|---|---|
| Consumer ID | The identifier given to the consumer during the Application registration process. |
| Consumer Secret | The secret given to the consumer during the Application registration process. |
| Call Back URL | The Application’s callback URL that’s registered with the server. |
| authorization URL | The endpoint for authorization server, which retrieves the authorization code. |
| Scope (Optional) | The scope of the access request (which might have multiple space-separated values.) |
| Access Token URL | The endpoint for the resource server, which exchanges the authorization code for an access token. |
| Access token has a limited validity | On check, you can define the validity of the token. |
| Validity | Validity of the token |
| Refresh URL Token | On refresh, new endpoint for the resource server |
| ADVANCE (Switch) | Switch on to view option |
| AUTH URL Parameters | Additional AUTH parameter |
| Access Token URL Method | Additional token URL method |
| Access Token URL Parameter type | Additional token URL parameter type |
| Access Token URL Header | Additional token URL header |
| Get Access Token ( Button ) | Click to get access token |
| Access Token | Display the access token |
| Refresh Token | Display the refreshed token |
| Validity | Validity (time) of the token |
Security Configuration (Switch)
By default, the security configuration is switched off. Turned on to configure security certificates
Configure Key store certificate
| Parameter | Description |
|---|---|
| Browser Certificate | Browse and upload key store certificate. |
| Select File Format | Select the key store file format. |
| Store Password | Enter the certificate store password |
| Key Password | Enter the certificate key password |
Configure Trust Store certificates
| Parameter | Description |
|---|---|
| Browser Certificate | Select the trust store file format. |
| Select File Format | Select the trust store file format |
| Key Password | Enter the trust certificate key password |
Configure security protocols
This section is switched off by default,

Click the switch button to configure the security.
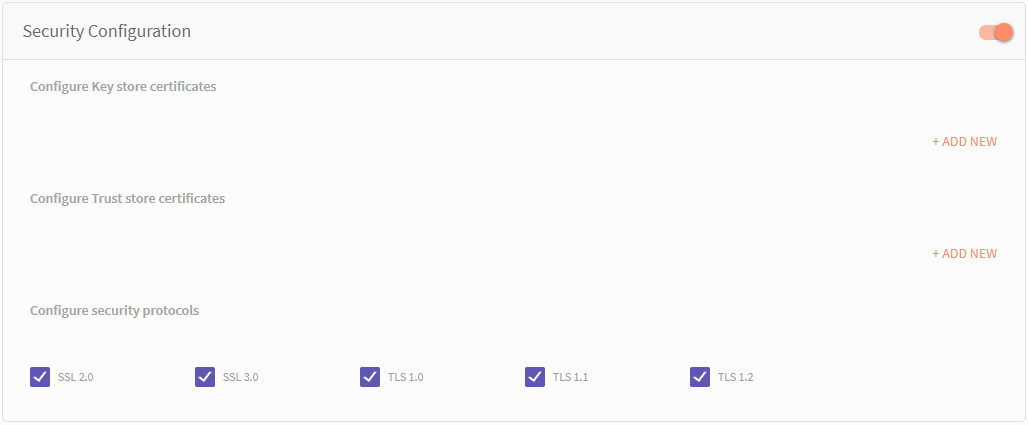
- Click Add New to add security certificate.
- Checkmark the security protocol that applies to the security. You can select more than one security protocol.
Supported Security protocols:
-
SSL keeps an internet connection secure and safeguard any sensitive data that is being sent between two systems, prevents reading and modifying any information transferred.
-
Transport Layer Security (TLS) is a protocol that provides privacy and data integrity between two communicating applications. IT is an updated, more secure, version of SSL.
| Security protocol | Description |
|---|---|
| SSL. 2.0 | In SSL 2.0, the client can only initiate a handshake at the beginning of the connection |
| SSL 3.0 | SSL 3.0 improved upon SSL 2.0 by adding SHA-1–based ciphers and support for certificate authentication. |
| TLS 1.0 | TLS 1.0 protocol to perform transaction |
| TLS 1.1 | TLS 1.1 protocol to perform transaction |
| TLS 1.2 | Use TLS 1.2 protocol to perform the transaction. It is the current version of the protocol, |
Headers
You can add parameters that are required to be sent as headers in the request or leave to default in case if there is no change in the header values.

| Element | Description |
|---|---|
| Parameter | Header parameters |
| Parameter value type | Type of Parameter: Dynamic or static |
| Field name/Parameter value | Enter the Field name for the Dynamic parameter. Enter value for Static parameter |
URL Parameters
Click ADD NEW to add URL parameter details

| Element | Description |
|---|---|
| Parameter | URL Parameters |
| Parameter value type | Type of Parameter: Dynamic or static |
| Field name/Parameter value | Enter the Field name for the Dynamic parameter. Enter value for Static parameter |
Body
In the request body text box, you can paste the body as Text, JSON, XML or form-data content-type to extract the parameters and select the body type from the drop-down menu at the extreme right.
- Click parse to extract the parameters.
- Configure the parameters
- set the parameter type and accordingly set the field name/value
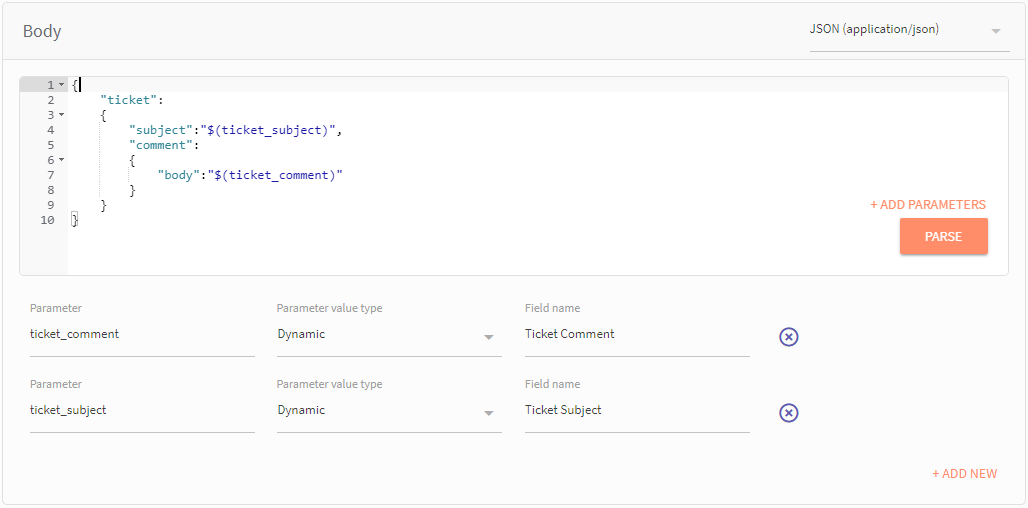
| Field | Description |
|---|---|
| API Body (Text box) | Enter the body of the request. |
| Parse (button) | Click to parse the variables |
| Parameter | Body Parameter |
| Parameter value type | Type of Parameter: Dynamic or static |
| Field name/Parameter value | Enter the Field name for the Dynamic parameter. Enter value for Static parameter |
Response - Configure node events
Node event can be created by importing the response paths from the sample response. Each response has to be mapped to a node edge by specifying the path of the status code/response object and the node edge from the drop down provided.
In the resonse tab,
a. Select the response content type from the drop-down menu
b. Click import from sample to enter sample response and to configure the request.
Note:
Import will populate both node events and node variables with the reference path.
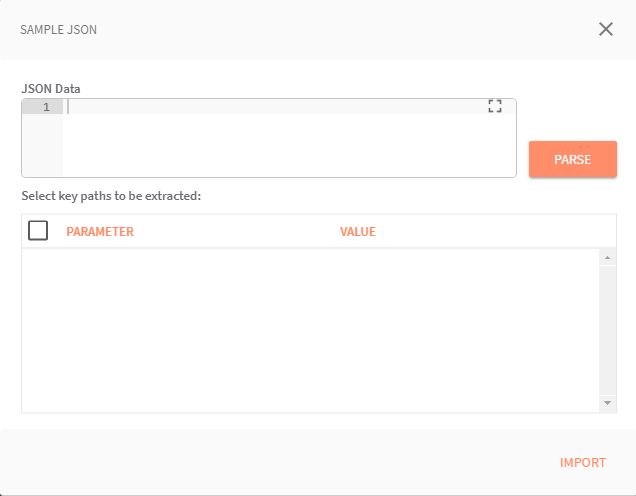
- In the 'Sample JSON pop up windows, paste the sample JSON code in the text box and click Parse.
- Parameters and value list is displayed for selection.
- Select the required parameters and click import to import parameters into the body.
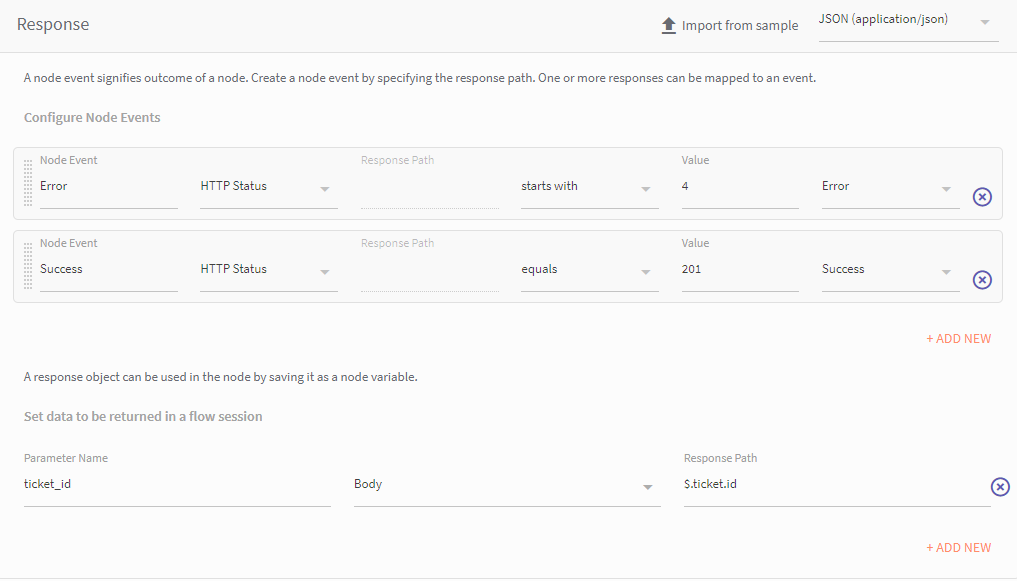
d. Configure node events by selecting the required details from the drop-down value provided.
Click Add to add node events, as per the requirements.
e. Set data to be returned in flow session
These parameters are available under the RESPONSE tab in the node and can be mapped to a session variable in the node. For more information, see Mapping session variables
Parameter Name: Name of the node Variable.
Set condition on: · Drop-down(body parameter/HTTP response/Header) which allows you to select reference path i.e, body parameter/HTTP response/Header.
Response path: ·Path of the object mapped to the node edge.
f. Click Save to save the current configuration.
You can add as many methods as you want for the node
Setting up NODE UI
The NODE UI tab has all the ‘dynamic’ parameters, for which the field type is to be configured. The Node UI tab allows you to configure the ‘Dynamic’ parameters which are defined in the API. Initially, all the parameter are grouped under ungrouped section. you can define new groups and
add parameters from the ‘Ungrouped’ group by dragging the same to the newly defined group.
For example,
You drag a ‘Ticket ID’ parameter and drop it in the new group(group1), after dropping the parameter user needs to select a Field Type for the parameter from the drop-down. Field Type dropdown consists of three field types: TextBox, Selection Box and Date Selection.
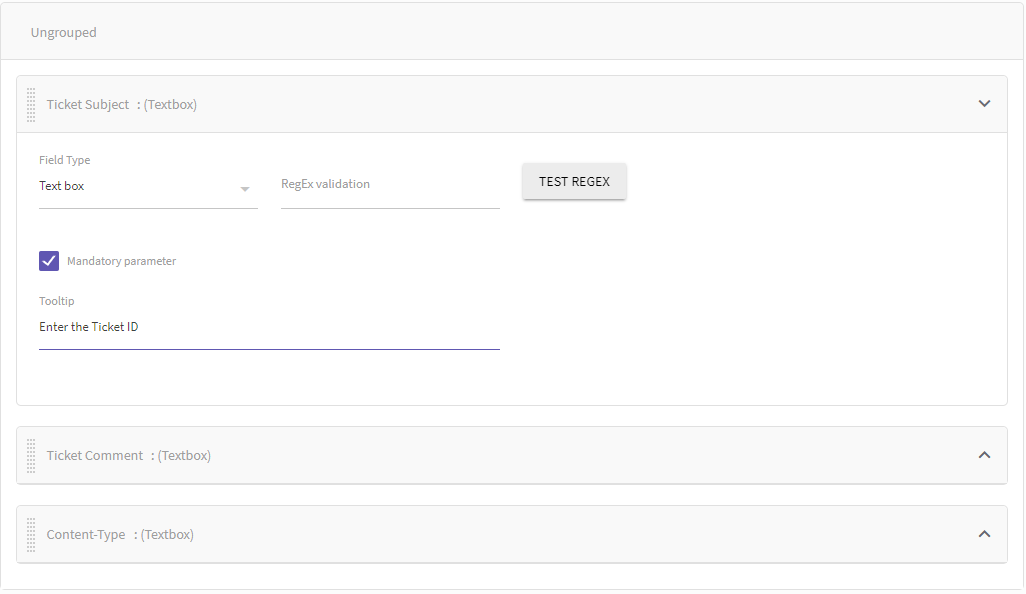
| Field Type | Desciption |
|---|---|
| Textbox | on selecting text box field type user will need to specify Regex validation. Any expression added here will validate the parameter. If there is an error it will be mapped to the error edge .For example if parameter is supposed to be a mobile number in India and the mobile number entered does not start with “+91”, then the node should exit from error edge with an error message of “Parameter validation failed” and the concerned code. |
| Selection Box | on selecting this field type user will need to add values, later from which the user can select in the node. |
| Date Selection | On selecting this user will need to specify the formats for date and time and the value can be entered in the node only in that format. |
Mapping session variables
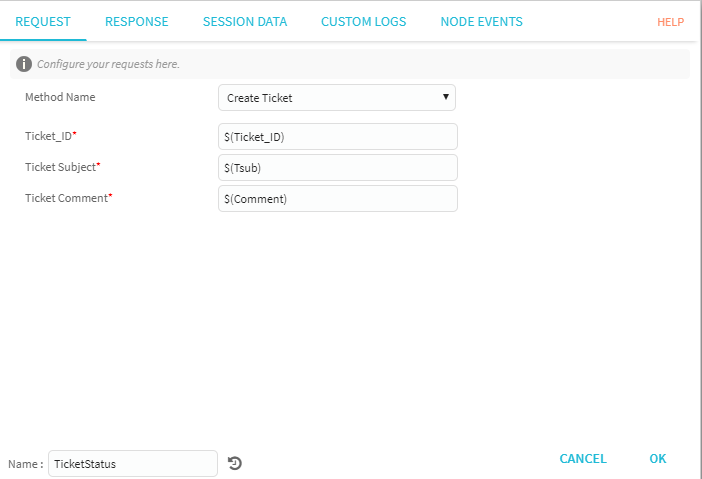
The dynamic fields are defined in the Body and configured in the Node UI. The response parameters are defined in Response section, under 'Set data to be returned in flow session'.
- On the flow canvas, when you click-open a custom node, all the dynamic variables are listed under the Request tab.
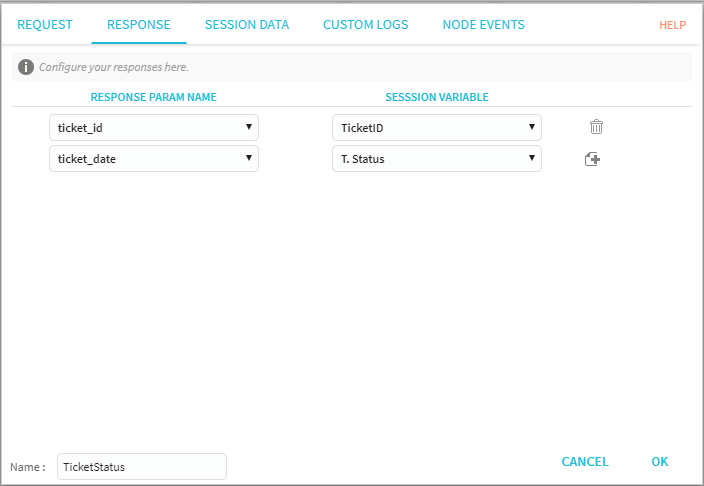
- Under the Response Tab you are required to map the Response parameters to Session Variable to use it in the flow.
- Select a Response Parameter from the drop down and then select or create a Session Variable from the drop down.
- Click OK to save the session variable configuration.
TEST
When you click TEST, you have a preview of the configured dynamic parameters. Supply the parameter values and the response from API is displayed in the response textbox.
Updated about 3 years ago