Setting up a Service
This guide will take you through the process of setting up a new service on the IMIconnect platform.
The sub-sections of service are:
Creating a Service in IMIconnect
A service is a localized workspace within your account, which allows you to organize specific flow-related assets, all under one location. Every service configuration gives a unique service key which is also used to authenticate and authorize all external triggers including the APIs. You may configure the following under the service:
- Inbound/outbound channels – SMS, Voice, App or Social messaging
- Template - Design/Use email templates
- Setup custom events inbound hooks
- Rules: Assign inbound hooks to basic actions or advanced logic configure on visual workflows.
To create a service in IMIconnect
- Go to www..imiconnect.com.
- Login with your credentials.
On successful login, the services window is displayed as shown below.
Click on a service block to open the service for further action.
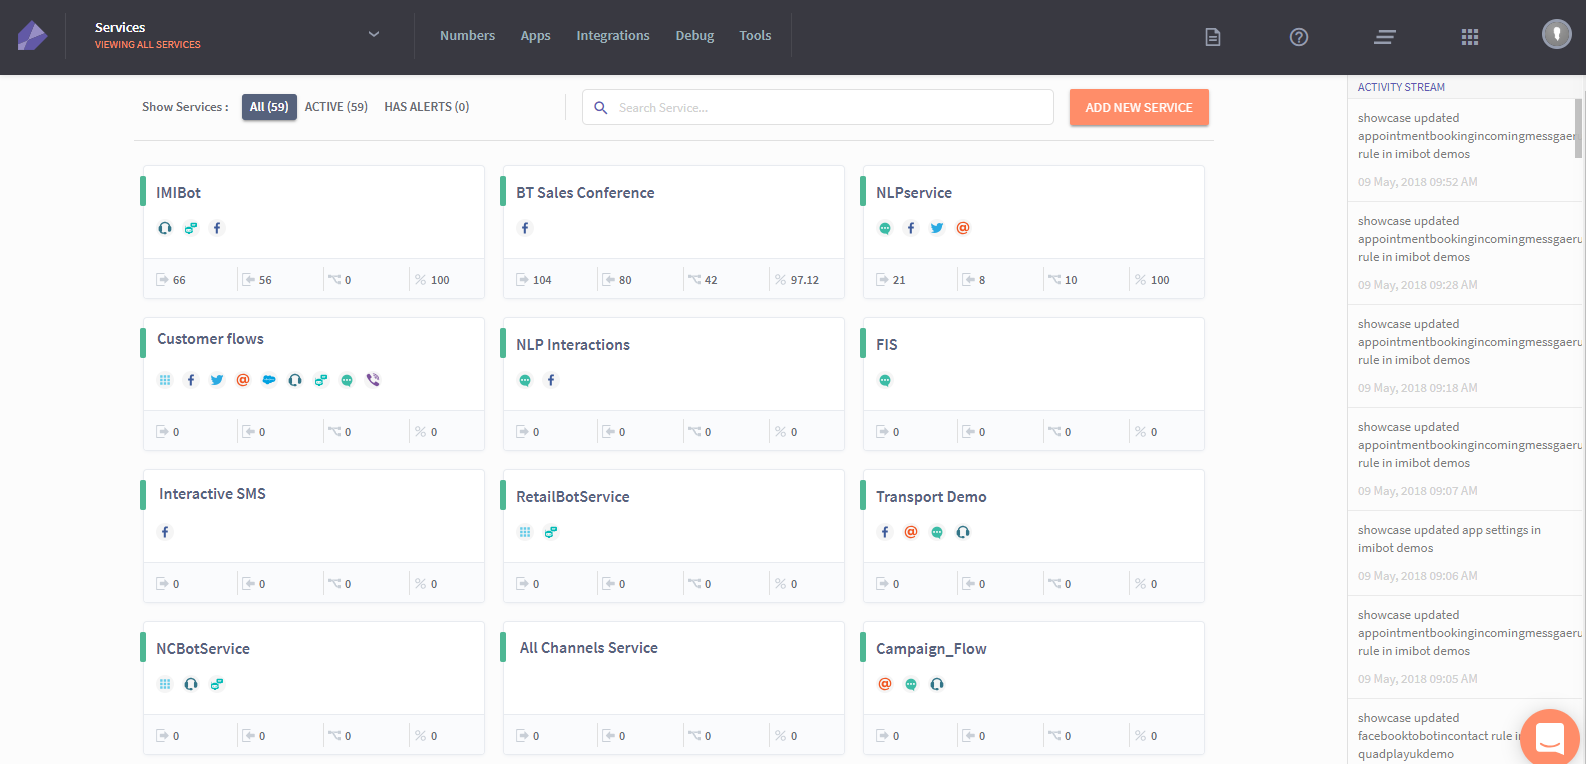
- Click ADD NEW SERVICE button to create a new service.
Enter the following details.- Service name: Enter the name of the service.
- Description: Enter a short description for the service.
- Click NEXT. The service is created and the service General Settings screen is displayed.
General Settings
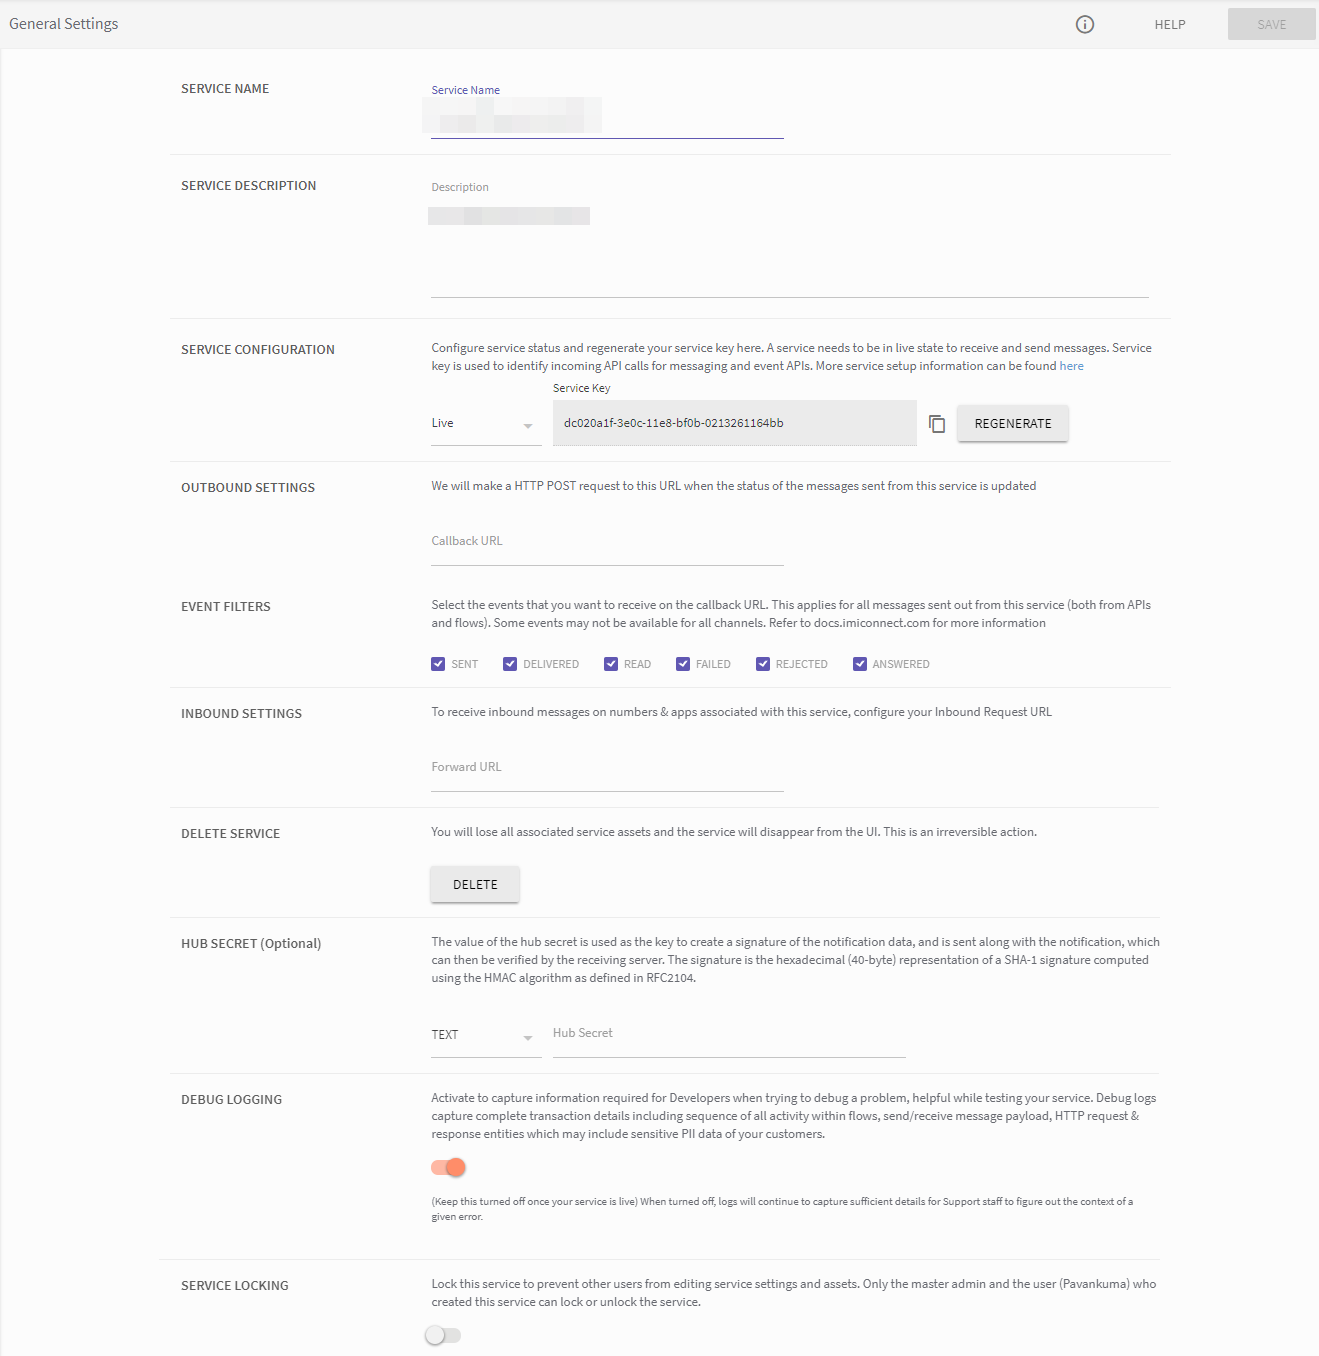
When you create/edit a service, you will be navigated to this screen to configure different settings for a service.
SERVICE CONFIGURATION
You can modify the status of the service by using the service configuration.
- Select Live from the drop-down to make the service live.
- Select Suspend from the service status drop-down to stop a service,
- If the service key is compromised, click REGENERATE to regenerate a service key.
Important
When you regenerate the service key, ensure to update the service key in the API calls.
OUTBOUND SETTINGS
Enter the URLs to get notified when a message is delivered.
Click on respective links to view the delivery receipt JSON formats.
EVENT FILTERS
Select the event that you want to receive on the callback URL that is configured in the Outbound Settings. The available event filters apply to all messages sent out from this service (both from APIs and flows). Some events may not be available for selected channels.
Note: You can select multiple events as desired

INBOUND SETTINGS
The inbound setting is used to receive inbound messages on numbers & apps associated with a service, configure your Inbound Request URL
- Enter the URLs to get notified when a message is received on any channel in the service.
- Click on respective links to view the message forwarding JSON formats.
DELETE SERVICE
To delete a service, click DELETE. All the assets that are associated with the service are deleted and cannot be restored back.
HUB SECRET (Optional)
The value of the hub secret is used as the key to create a signature for the notification data. The same is sent along with the notification, which can then be verified by the receiving server. The signature is a hexadecimal (40-byte) representation of a SHA-1 signature computed using the HMAC algorithm as defined in RFC2104.
- From the drop-down, select the Hub Secret Type and then enter the Hub Secret Value.
DEBUG LOGGING
Capture information required for Developers when trying to debug a problem, helpful while testing your service. Debug logs capture complete transaction details including a sequence of all activity within the flow, send/receive message payload, HTTP request & response entities which may include sensitive data of your customers.
- Use the switch button to
switch on/offtoactive/deactivatethe debug logging service.
SERVICE LOCKING
A user who creates a service can also lock that service. Users cannot lock a service that is owned by others. When a service is locked, assets in that service cannot be edited. Only an administrator and the user who created the service can unlock the service.
Numbers Settings
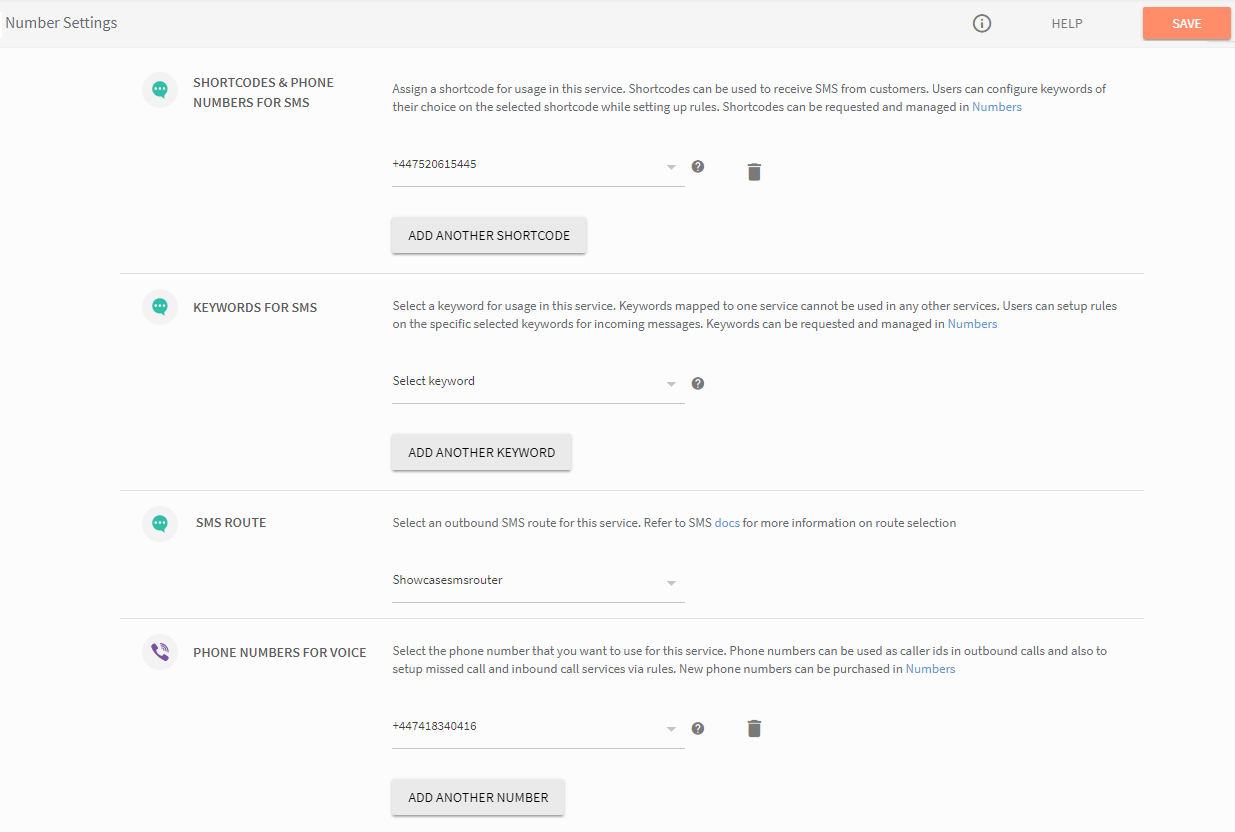
You can assign and configure numbers for usage in this service. These numbers are purchased in the Numbers within the service.
SHORTCODES & PHONE NUMBERS FOR SMS
Select the Shortcode/phone number from the drop-down. You can add multiple Shortcodes/phone numbers to a service. You can create rules to manage messages received on the Shortcodes/phone number or you can execute custom events.
KEYWORDS FOR SMS
Select the Keyword from the drop-down. You can add multiple Keywords to a service. You can create rules to manage messages received on the Keywords or you can execute custom events. Keywords are managed in Numbers
SMS ROUTE
Select an outbound SMS route from the drop-down list. The route that is displayed in the drop-down signifies a cost associated with each message sent. The route is created by the IMIconnect support team as per the client requirement.
PHONE NUMBERS FOR VOICE
Select the voice number from the drop-down. Phone numbers can be used as caller ids for outbound calls and also to setup missed call and inbound call services via rules. You can add multiple numbers to a service. Phone numbers that are purchased through IMIconnect will be displayed in the drop-down.
App Settings
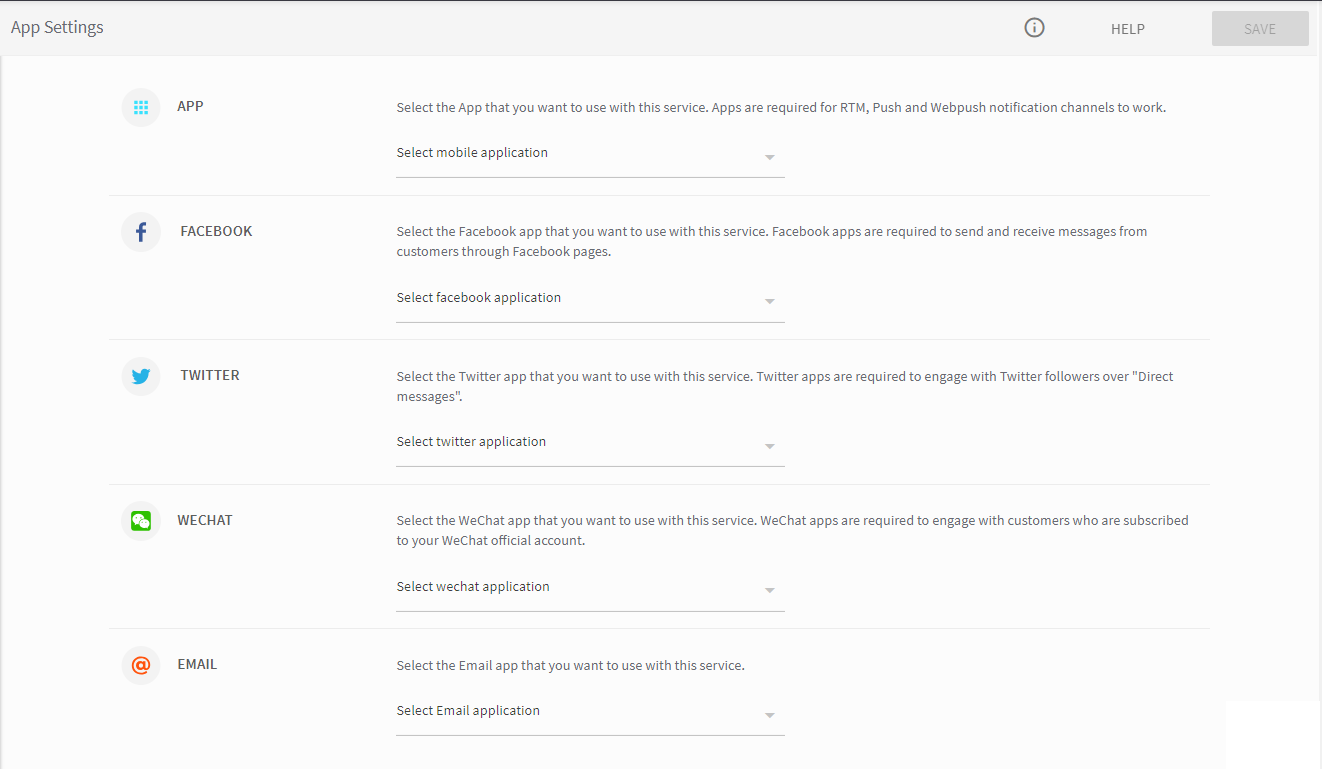
When an application is added to the Apps screen, it can be configured with a service. This service allows you to send and receive messages for the configured channels. The channels that are configured are made available in rules.
- To configure Real-Time Messaging (RTM) channel, select a mobile application from the drop-down and enter stream name. The stream is a topic name to which the message will be published.
- Select respective channel application from the drop-down to configure them with the service:
- Apps
- Click SAVE to save the configuration changes,
Integration Settings
IMIconnect support third-party application integration, thus customers obtain additional value by integrating with third-party applications to fulfill their communication needs.
The integrations available in IMIconnect:
Templates
Templates are pre-set messages that can be referenced for use under each channel. IMIconnect platform enables the clients to create custom-rich templates, for each channel to be used within the services. Templates can be used for the services in outbound messaging by using rules or APIs. The variable names are stored in the templates which can be passed in a messaging API request or an external event API request. The message to be sent will be constructed using the variables passed in the API request (or from customer profile attributes read more in appendix) and the template.
Templates come into play when an application / service using the API is expected to simply pass a set of name - value pairs and expect the platform to construct the final channel-specific message to be sent out.
- A template can have different message for each channel mapped to the service.
- A service can have any number of such templates referenced by their template ID, but each template can have one message per channel.
- Replacement parameters in the template are identified using a
$(replacement_parameter)notation. - The parameters sent as channel’s JSON overrides the template.
- Template text can include simple text and URLs.
- Templates are applicable for both unified messaging and individual channel API.
- If fully formed messages are sent within the API call, then the template will be ignored or overridden.
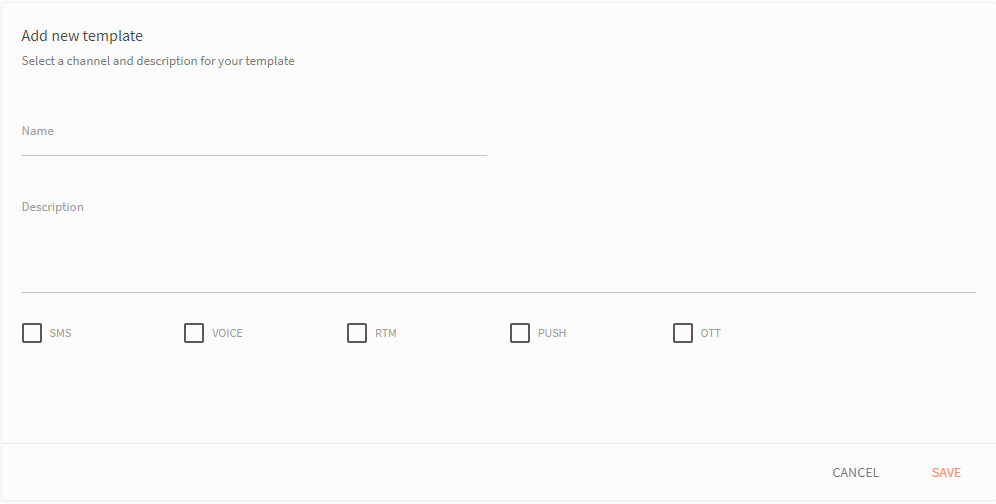
SMS
To create a template for SMS
-
Select the SMS checkbox.
-
Configure the following:
- Enter message body: Enter the message.
- Sender ID: Select a Sender ID from the drop-down.
- Select Message Type: Select the message type from the drop-down menu; option available are:
- Text
- Flash
- Binary
- Unicode
- Expiry In: Choose the SMS expiry option from the drop-down and enter the relevant value in the corresponding text box.
- Second
- UTC
-
Click SAVE to save the configuration.
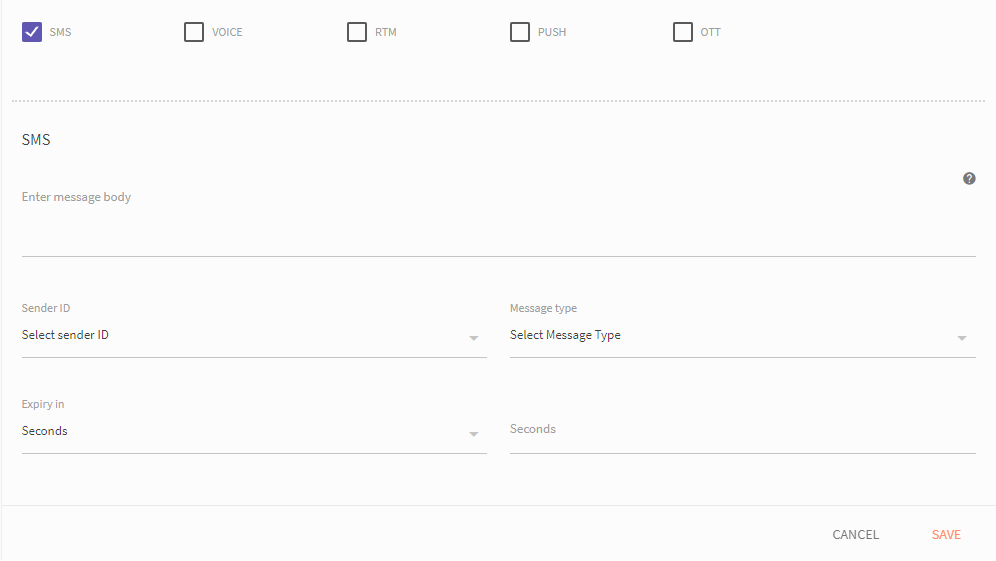
Voice
To create a template:
- Select the Voice checkbox.
- Configure the following:
- Select voice number: Select number to initiate a voice call from the drop-down.
- Select voice flow: Select voice flow that should be attached to the call.
- Expiry In: Choose the voice expiry option from the drop-down and enter the relevant value in the corresponding text box.
- Second
- UTC
- Click SAVE to save the configuration.
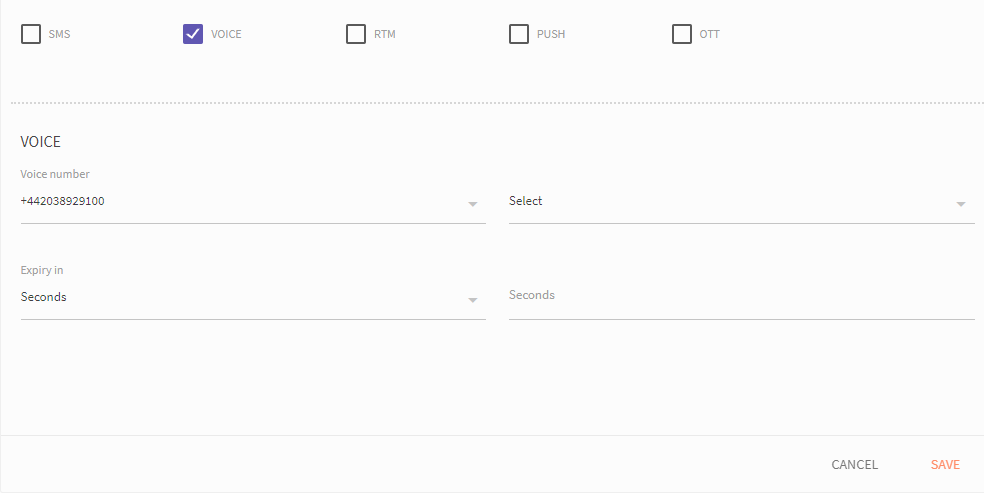
RTM
To create a template for highly reliable real-time messaging, enter the following details:
- Select the RTM checkbox.
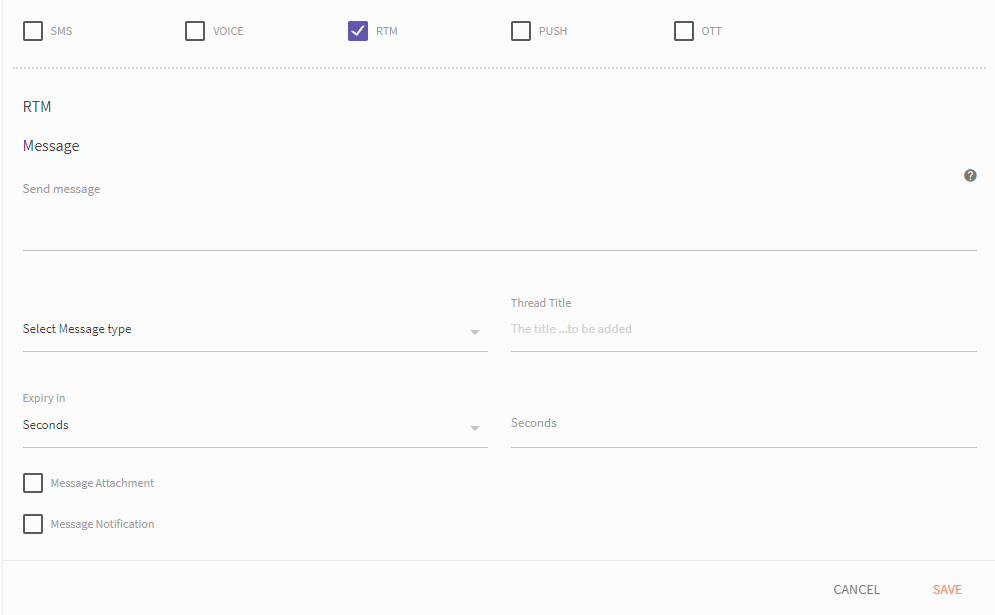
- Configure the following:
-
Message: Enter in-app message in the Send message field. A maximum of 500 characters per message can be sent.
-
Select Message type: Select a message type from the list of available options: Conversation or Announcement.
-
Thread title: Enter a title for the thread. Only Alpha-numeric values with any special characters with a maximum length of upto 100 characters is allowed.
-
Expiry In: Choose the RTM expiry option from the drop-down and enter the relevant value (Seconds or UTC) in the corresponding text box.
-
- To attach a message, enable the Message Attachment checkbox.
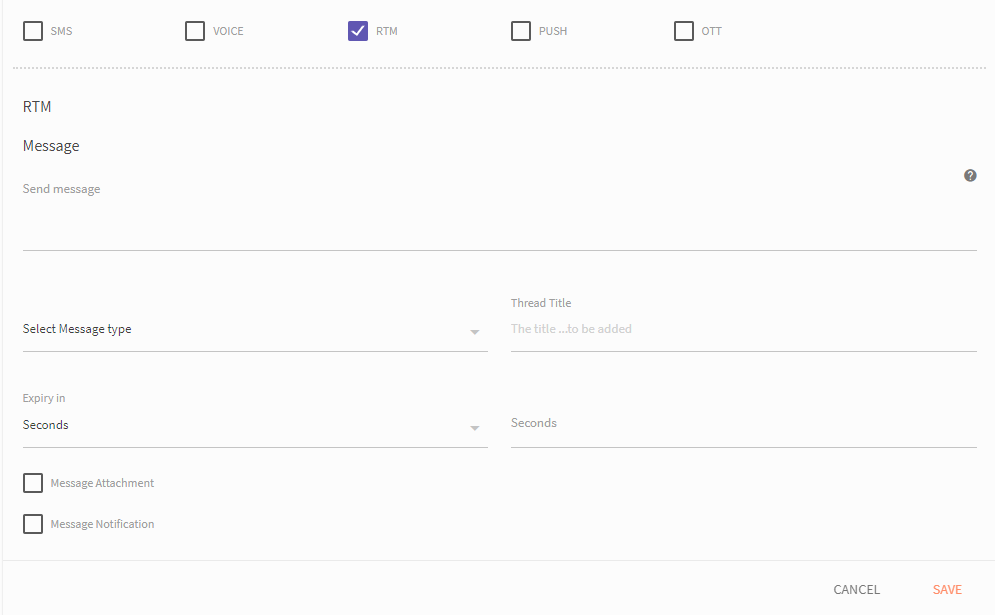
From the drop-down, select an attachment type:
- File
- Image
- Video
- Audio
- Location
- In the Attachment URL, enter an attachment URL.
- In the Attachment Size, enter the file size (in kb). The size mentioned here is displayed in the attachment's preview.
- In the Attachment play duration, enter the time (in seconds).
- To enable message notification, enable the Message Notification checkbox.
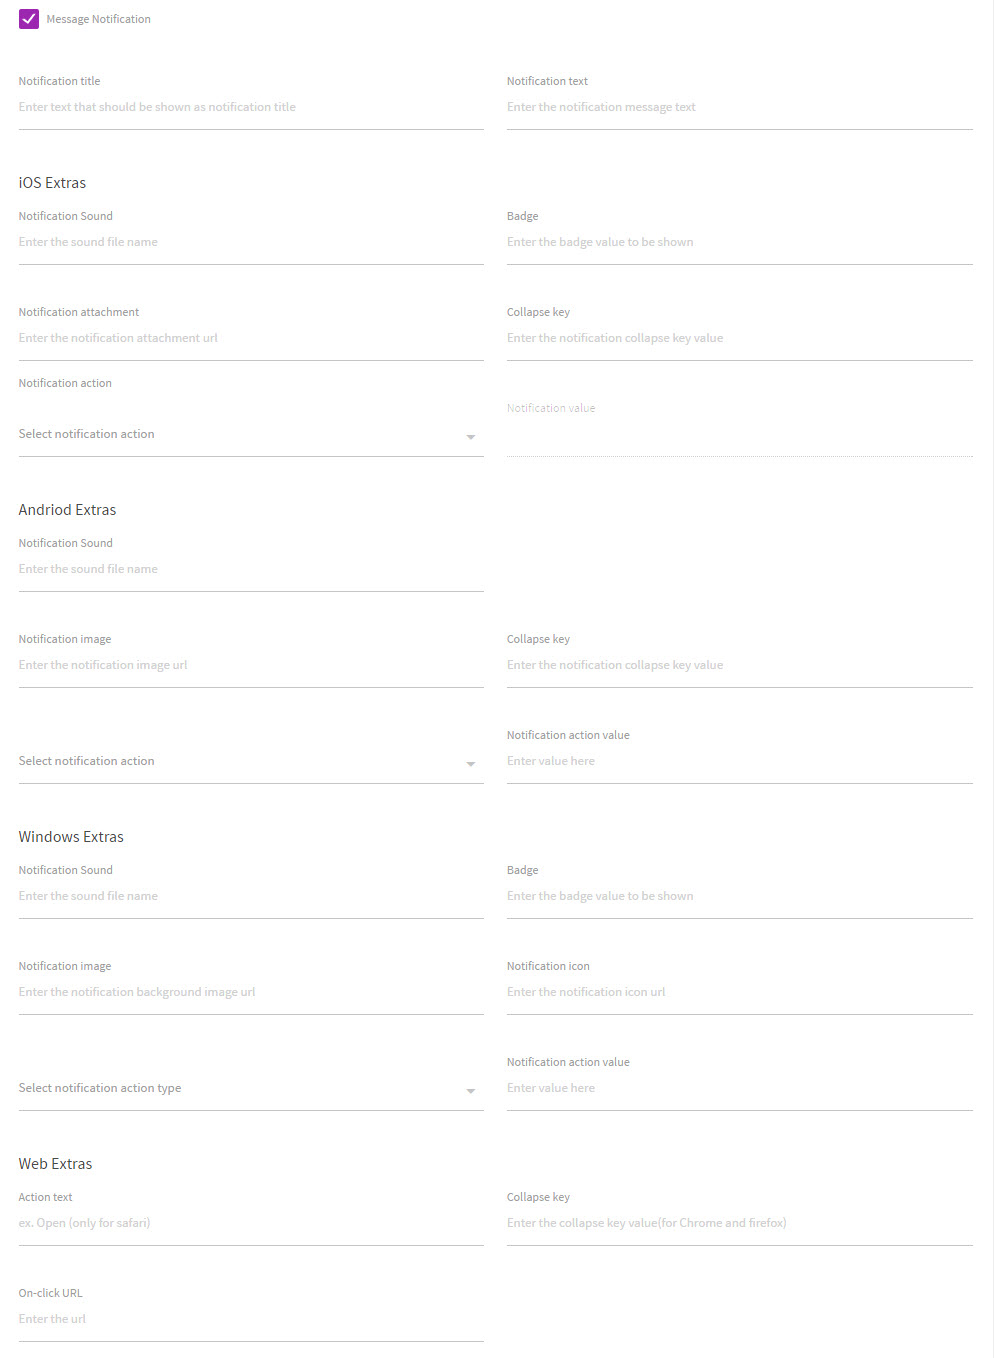
-
In the Notification title, enter text that should be displayed as notification title.
-
In the Notification text, enter notification message text.
-
The notification headings are the notification headings in the following platforms,
-
Click SAVE, to save the configuration.
iOS Extras: The configurable parameters.
Field | Description |
|---|---|
Notification Sound | Specifies the sound file name, which should be played. |
Badge | Specifies the badge value, which will be displayed. |
Notification Attachment | Specifies the name of the notification attachment. |
Collapse Key | Specifies the collapse key. |
Notification Action |
|
Android Extras: The configurable parameters.
| Field | Description |
|---|---|
| Notification Sound | Specifies the sound file name, which should be played. |
| Notification Image | Specifies the URL with image. |
| Collapse Key | Specifies the collapse key. |
| Select Notification action | Select from the following options: -- OPEN_URL -- OPENWEBVIEW -- DEEPLINK -- OPEN_HTML -- OPEN_APP |
| Notification Action Value | Specifies value of the notification action selected. |
Windows Extras: The configurable parameters.
| Field | Description |
|---|---|
| Notification Sound | Specifies the sound file name, which should be played. |
| Badge | Specifies the badge value, which will be displayed. |
| Notification image | Specifies the URL with image. |
| Notification icon | Specifies the notification icon. |
| Select Notification Action | Select from the following options: -- OPEN_URL -- OPENWEBVIEW -- DEEPLINK -- OPEN_HTML -- OPEN_APP |
| Notification Action value | Specifies value of the notification action selected. |
Web Extras
Table below describes the configurable parameters.
| Field | Description |
|---|---|
| Action text | Specifies the action text (applicable to Safari browsers only). |
| Collapse key | Specifies the collapse key. |
| On-click URL | Specifies the on-click URL. |
- To add interactive buttons to the notifications, enable the Add interactive buttons to this notification.

- In the Message ref, enter a reference text value.
- From the Select interaction drop-down, choose Single button or Two button. Based on the selection in the interaction field, from the Select Category drop-down, select a category.
- To save the changes, click SAVE.
PUSH
To send a push notification through templates, it requires the below basic steps to create a template for iOS and Android platforms:
- Select the PUSH checkbox.
- Select the mobile checkbox to configure a mobile device.
a. Configure the following for iOS platform,- Enter push body for iOS: Enter the text message for push notification.
- Enter sound name file: Enter the name of the sound file to be played when the notification is delivered.
- Badge: The number to exhibit as a badge of the app icon.
- URL: Enter the URL to download the rich text of notification.
- HTML: Enter the HTML string to display styled text.
- Silentpush: Enter
- Time to live: Setting a time span to the messages after which the undelivered messages are tossed out at once.
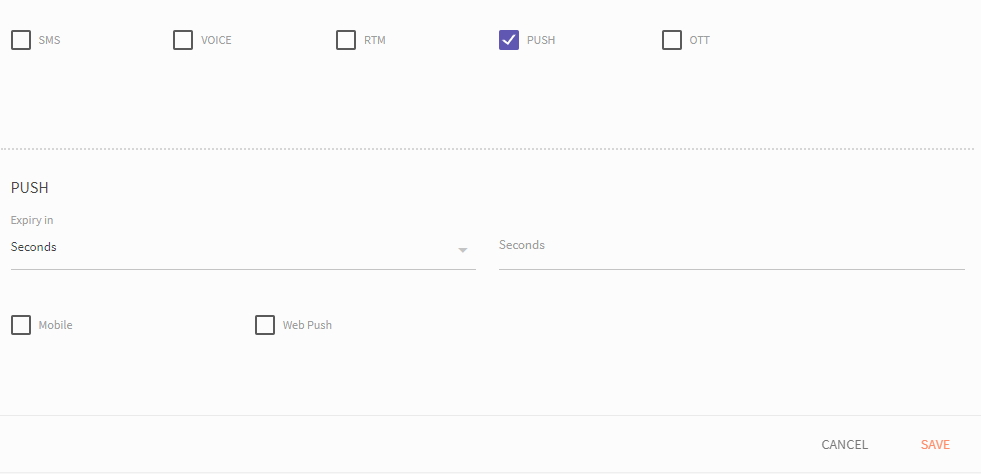
b. Configure the following for Android platform:
- Enter push body for Android: Enter the text message for push notification.
- Enter sound name file: Enter the name of the sound file to be played when the notification is delivered.
- Collapse key: Enter the string to break up a group of like messages and send only the latest message by discarding the old messages if undelivered.
- URL: Enter the URL to download the rich text of notification.
- HTML: Enter the HTML string to display styled text.
- Time to live: Setting a time span to the messages after which the undelivered messages are tossed out at once.
- Select Android priority: Select the priority 5 to 1 from the drop-down, where a priority of 5 refers to high and 1 refers to low. The notifications with high priority are displayed on top in the notifications tray than the low priority notifications.
- Delay while idle: If true, delays the message delivery if the destination device is idle.
-
Select Add interactive buttons to this notification checkbox to add interactive buttons. Click here for additional information on interactive notifications.
-
Click SAVE to save the changes.
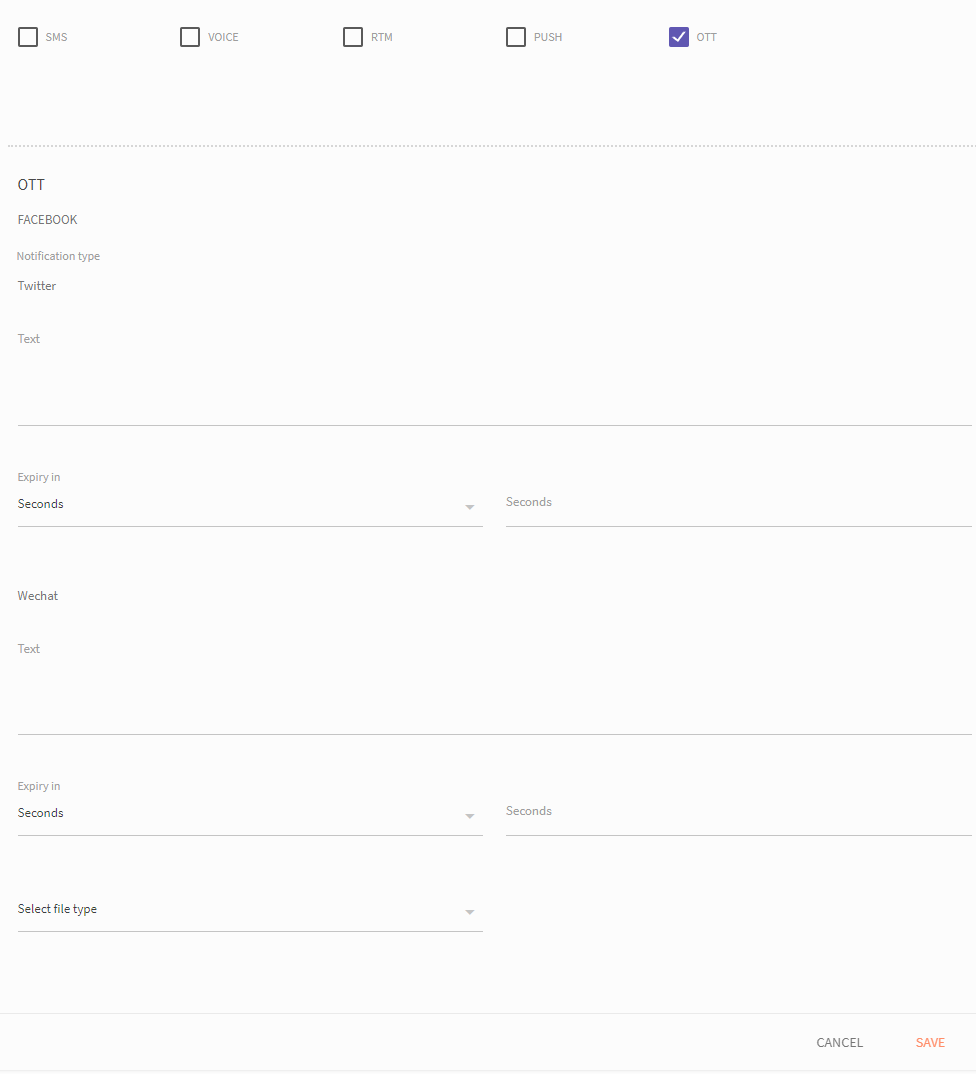
OTT
You can send messages on OTT channels through templates.
- Select the OTT checkbox.
- Enter the message text and expiry time for OTT channels:
- Click SAVE to save the changes.
Flows
Flow builder provides a visual interface to build interactive communication workflows with minimum programming or scripting efforts. These workflows can be triggered through simple standard-based APIs, FTP file drops, and through Message Queues (MQ). You can create one or more workflows using the workflow designer and associate with a service. The context of the service and the rule that triggers the workflow is configured under a service.
- A flow can be invoked by a rule, if the configured conditions are met when a specific event is triggered.
- An event can be a channel based event or a custom event that can be triggered from an external application through the event API.
- A flow can be used in multiple rules under a service.
To create a flow.
- On the dashboard, click Flows.
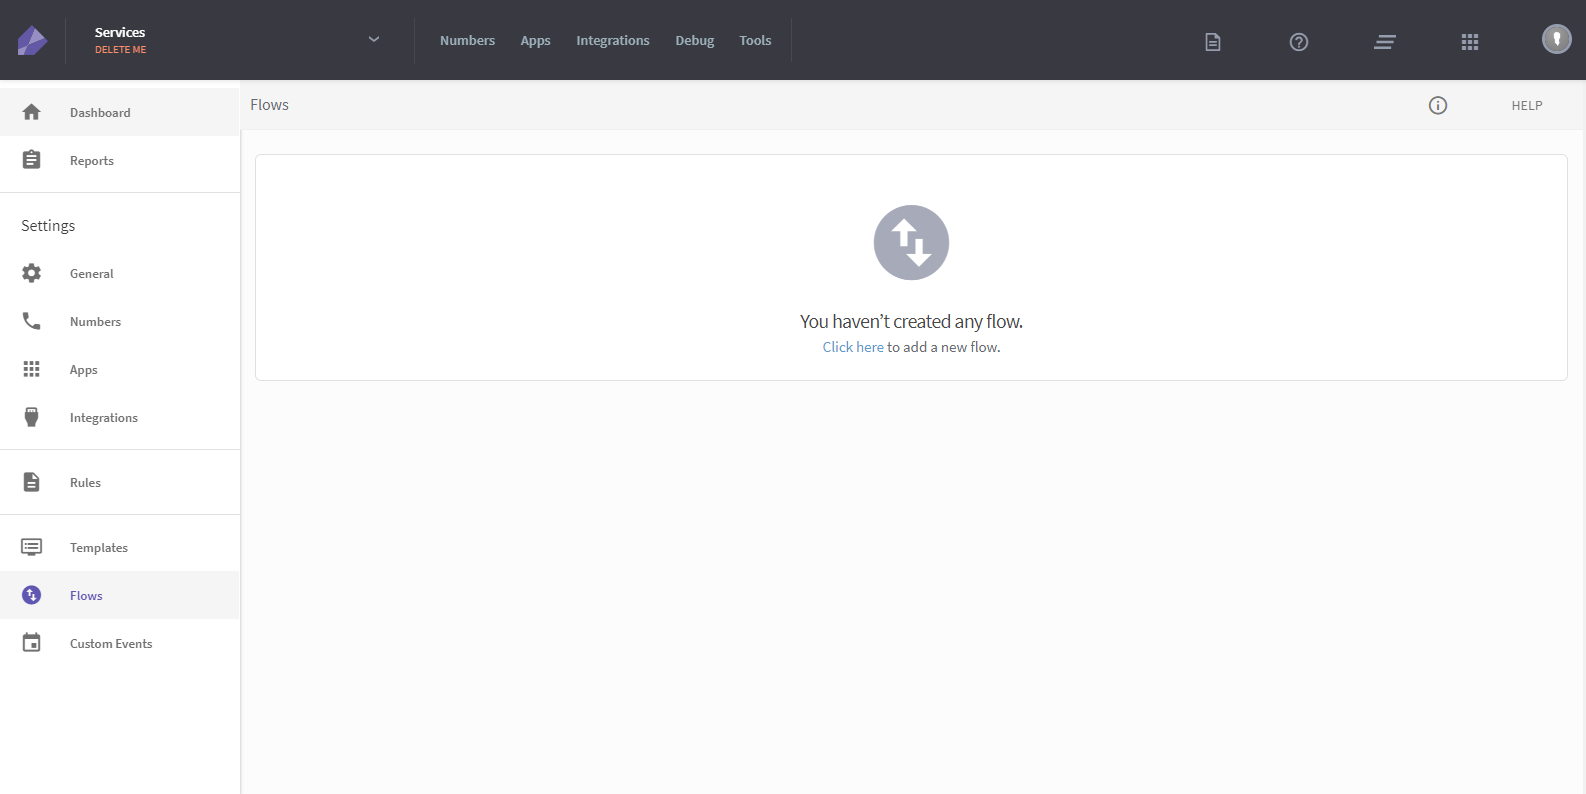
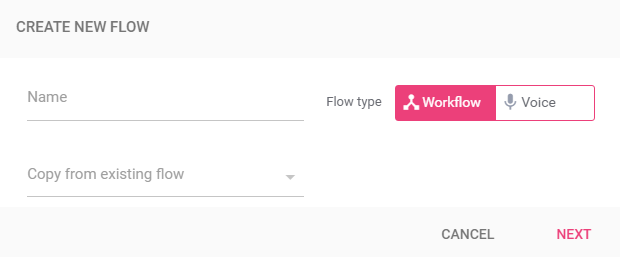
- To add a new flow, choose Click here. The CREATE NEW FLOW screen is displayed.
- Enter a name for the flow and select flow type.
- Workflow: Select this option to create a workflow.
- Voice: Select this option to create a voice flow.
- Copy from existing flow: Select this option to create a flow from an existing flow. To import the flow from the drop-down, select the flow from the drop-down.
- Add 'Nodes' or make changes to the flow and click SAVE. For more information on nodes and flows, refer Flowbuilder](http://docs.imiconnect.com/docs/flowbuilder).
- To go back to flows screen, click Back to flows available at the lower left corner.
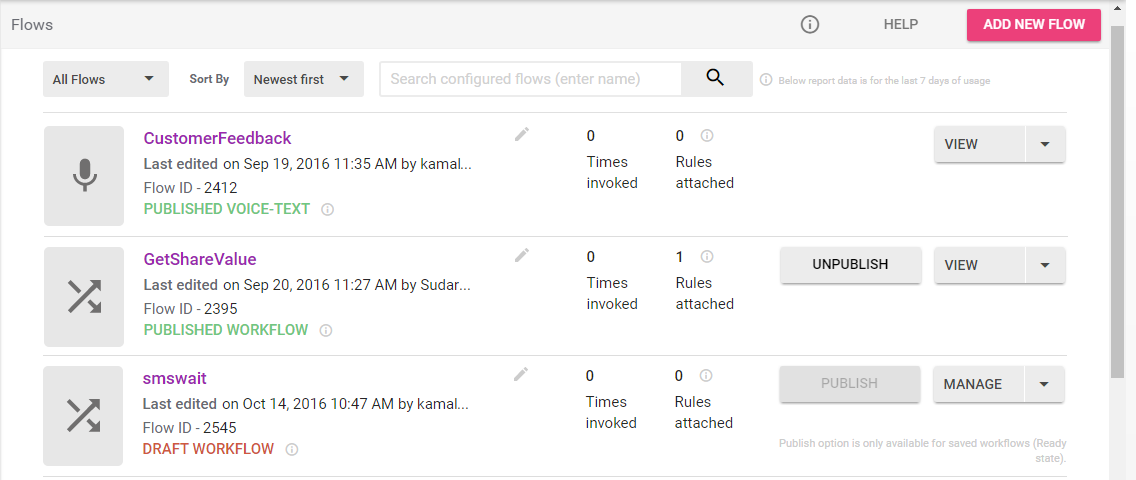
- To edit a flow that is in draft or unpublished state, click Manage.
- When the flow is ready, click PUBLISH. Flows that are in Ready or Draft state cannot be used in Rules. Only published flows can be used in rules. If you do not want to use a flow for some reason, click UNPUBLISH.
- To view the summary of the workflows invoked in a service, click REPORTS. The default report displays the number of times this flow is invoked in a week. You can apply the filter to view the report for the selected days.
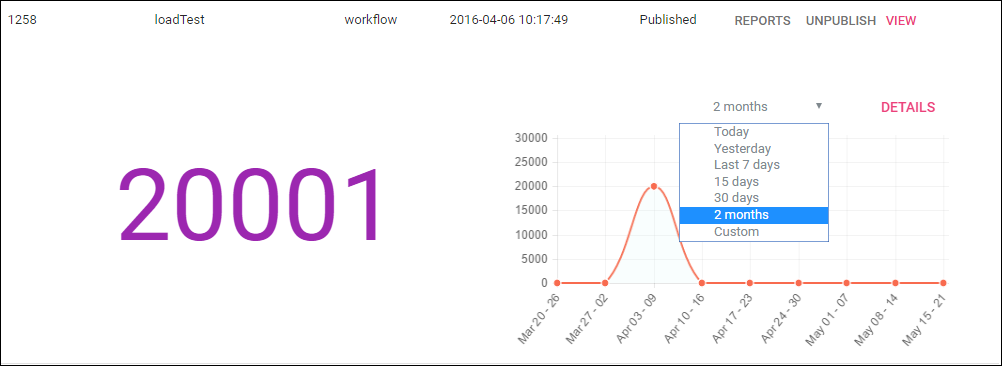
- To view the complete report, click DETAILS and then select the period.
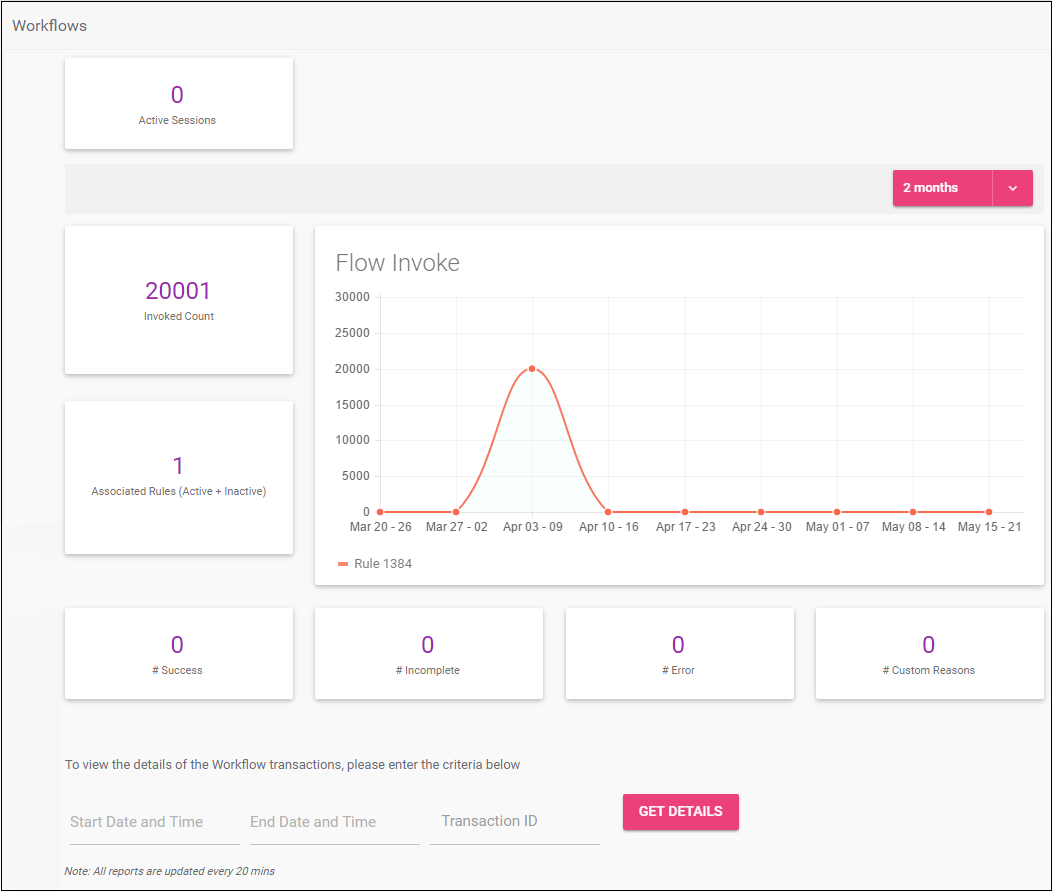
The options of the detail report are described in the table below.
| Field | Description |
|---|---|
| Active Session | Specifies the active sessions that are open when the report is created. For example, these sessions might be waiting for an input from a node. |
| Invoked Count | Specifies the number of times (count) this flow was invoked. |
| Associated Rules (Active + Inactive) | Specifies the number of rules in which this flow is configured. |
| Success | Specifies the number of times this flow is successful. |
| Incomplete | Specifies the number of times this flow is incomplete. To get the incomplete count, it must be configured in a flow. |
| Error | Specifies the number of times this flow has an error. To get the error count, it must be configured in a flow. |
| Customer Reasons | Specifies the number of times this flow has customer reason. To get the count, it must be configured in a flow. |
- To generate the workflow transactions report, select Start Date and Time, End Date and Time, and Transaction ID.
- Click DOWNLOAD and select the appropriate format to download the report. The available formats are:
- Excel
- CSV
Custom Events
Custom events allows user to set up event listeners with user-defined parameters and validations that can be invoked remotely from an external application. This allows for establishing a secure data exchange mechanism between third-party applications and IMIconnect platform. Events are defined in the Services section by defining parameter blocks that consist of variable names and types. Once configured, custom events can be used within Rules to trigger actions.
External application can raise one or more events in a single request. Each event can be attached with a set of parameters representing event specific information. These parameters will be passed as context parameters to the actions defined in the rules on custom events.
To create a custom event, follow the steps below:
- Click Custom event.
- Enter a Name for the event.
- Configure the following parameters:
- Select type: Select the parameter type from the options available in the drop-down:
- String
- Int
- boolean
- Variable Name: Enter a namein the variable name field.
- Mandatory: If the parameter is mandatory, then select Mandatory, else, select Optional from the drop-down.
- Default Value: Enter the default parameter value, if any.
- To add additional parameters, click ADD NEW.
- To save the changes, click SAVE.
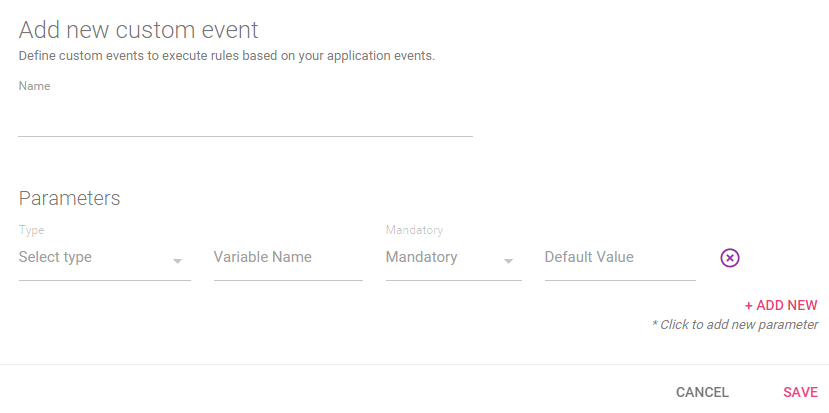
Scenario: Invoking a custom event when mandatory and default parameters are defined.
Assume a customer is ordering a product from an on-line shopping website. A custom event is created with a variable name and default values as below.
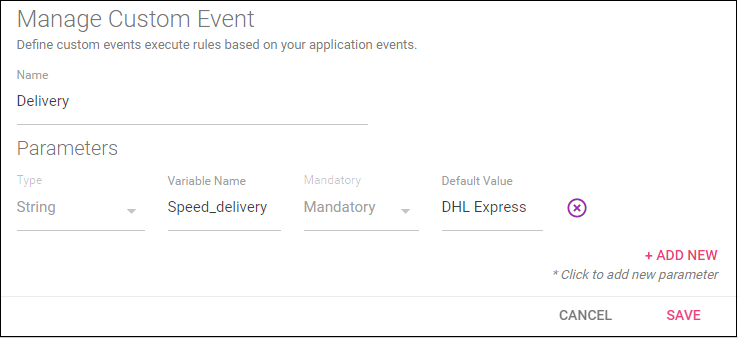
An event ID is generated in IMIconnect.

The parameters defined in the external event API take priority over the parameters defined in IMIconnect. The parameters of external event API:
{
    "expiry":"2016-04-12T18:51:19",
    "notifyurl":"http://www.amazon.co.uk/delivery/courier/notify",
    "events":[
        {
            "evtid":1371,
            "correlationid":"2934",
            "parameters":
             {
                "Speed_delivery":"DHL Express",
                "mobile": "9848098480"
             }
        }
      ]
}
A rule or flow may be invoked to send an SMS to DHL with the details of product pick-up ordelivery.
This event returns an error if the default value is not added for the parameter defined in IMIconnect or in an external API event.
Updated about 1 year ago